The Spanish version is the authoritative reference. View in Spanish
Document Issuance — Documentar Module
The issuance of Electronic Tax Documents (DTE) begins in the Documentar (Issue) module.
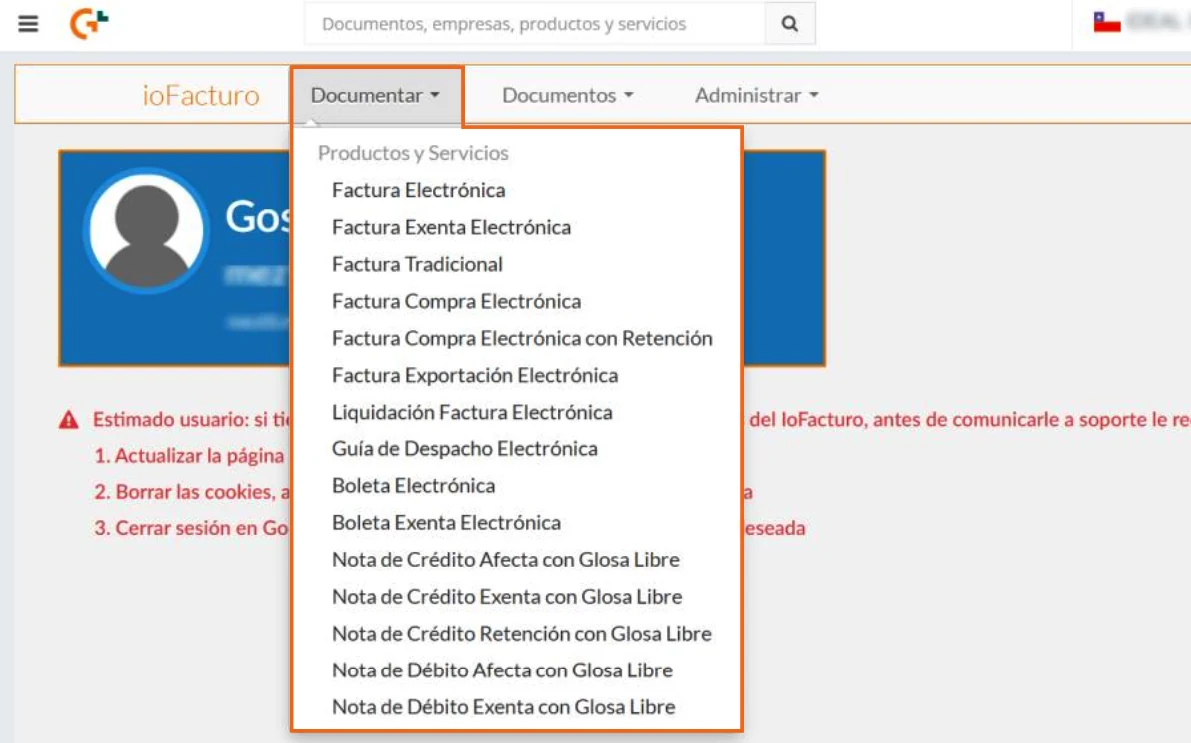
The first part of the form is very similar across all document types. Each section of the issuance form is described below.
Document Data
This is the first section to be filled in for issuing the document. Enter the data as indicated below:
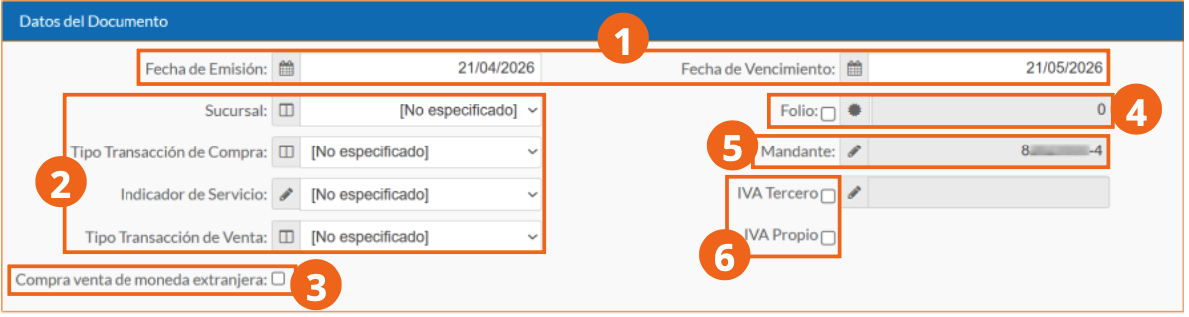
- Using the calendars shown when you click the respective field, select the document's issue and due dates.
- Select:
- The branch office from which the document is issued. You can choose among the ones you previously registered in the ioFacturo configuration (see Branch Offices).
- The transaction type for which the document is issued, which can be:
- Business purchases
- Supermarket or similar purchases
- Real estate acquisition
- Fixed asset purchase
- Purchase with common-use VAT
- Purchase without credit right
- Purchase not to be included
- The service indicator, from which you can choose:
- Invoice for periodic household services
- Invoice for other periodic services
- Service invoice
- The sale transaction type, which can be:
- Business sales
- Fixed asset sale
- Real estate sale
- If the sale will be made in a currency other than the Chilean peso, click the checkbox.
- To manually assign the document's folio number, click the checkbox.
- The Mandante (Issuer) field is shown for information only, so you can verify the tax ID of the document's issuer — in this case, your company.
- Select the IVA (VAT) to apply to the document.
Remember that the folio you assign manually must have been uploaded beforehand from the Administrar (Manage) module before you can assign it. See Folios.
Issuer Data
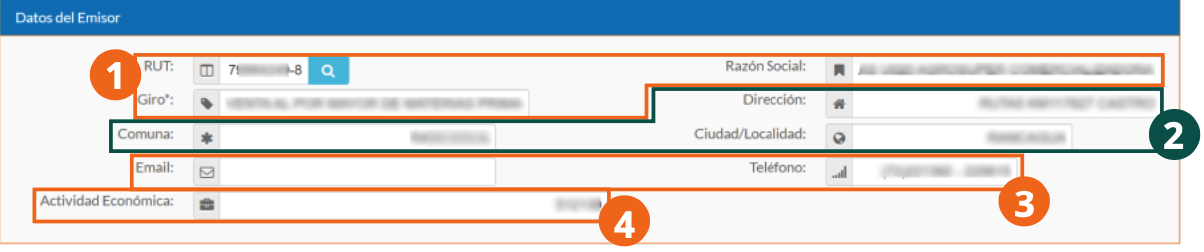
- Issuer's tax data.
- Location data of the company issuing the document.
- Issuer's contact information.
- Issuer's economic activity type.
Transport Data
In cases where goods must be moved from one point to another, this section must be filled in with the following data:
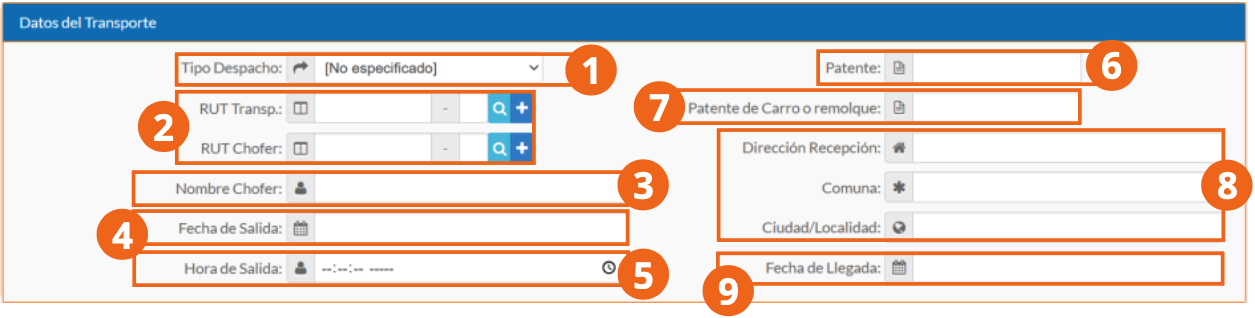
- Select the dispatch type; that is, whether it is paid for by the receiver, by the issuer at the customer's instruction, or by the issuer for another reason.
- Click the search icon to select the record of the carrier or driver who will perform the service, or click the + sign to add a new carrier or driver record.
- The Driver Name field updates automatically based on the previously selected record.
- Using the calendar shown when you click the field, select the departure date of the goods.
- By clicking the field, you can select the Departure Time of the goods.
- Enter the license plate number.
- Enter the license plate number of the truck or trailer that will transport the goods.
- Capture the location data of the goods' destination.
- Click the field to select the arrival date of the goods on the calendar.
Issuer GeoRef
In this section, you must enter the georeferencing data of the document's issuer; that is, of your company.

Timber Handling
If the document involves timber handling, this section is shown when indicated, with the following data groups:
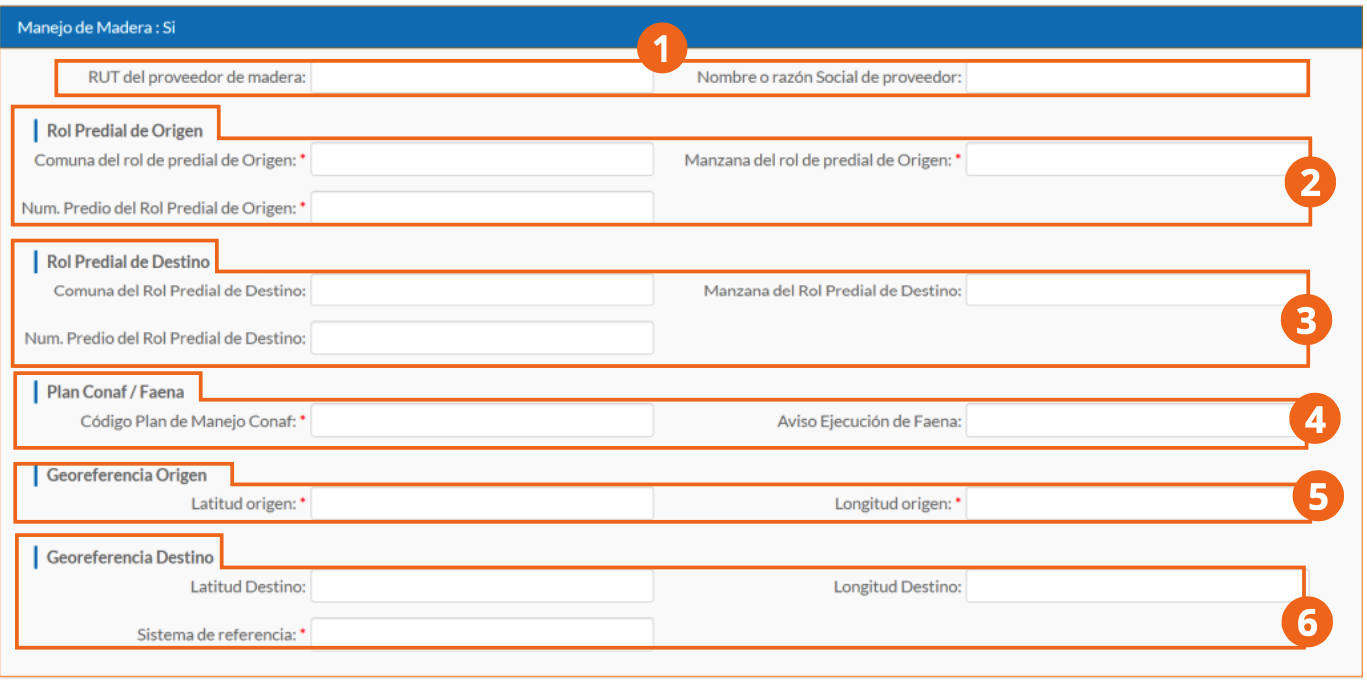
- Identification data of the timber vendor.
- Information on the land registry of origin of the timber.
- Land registry references for the destination of the timber.
- CONAF documentation data.
- Origin georeferencing information.
- Destination georeferencing.
Receiver Data
In this section, fill in the fields as indicated below:
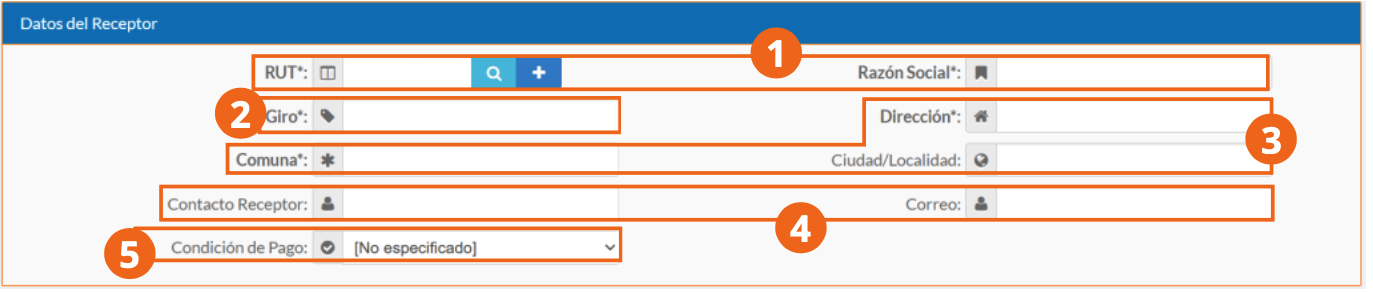
- Using the search button, select a previously registered receiver; or you can register a new one using the + button. This will automatically show the receiver's legal business name according to their record, in the corresponding field.
- Enter the line of business of the receiving company.
- Enter the receiver's location data.
- Capture the receiver's contact information.
- Select the document's payment terms.
Document Details
Enter and select the data of the products sold through the document as follows:

- Select the product from the list of records using the search button. This automatically loads the product's code and unit of measure according to its record.
- Enter the number of units of the same product to be sold. Based on this data, the corresponding values are shown in the tax and price fields.
- If applicable, click Adicionar (Add) to add a discount or surcharge applicable to the product. Once all the data has been entered, the calculation of the product's value total is shown according to this data.
- Press X to remove the added product line.
- Click Agregar línea de Detalle (Add Detail Line) to add another product sold in the document.
References
If applicable, click the references button and enter the following data:

- Choose the Global Indicator of the referenced document.
- Enter the folio number of the referenced document.
- Select the issue date of the referenced document.
- Capture the reason the document is being referenced.
- To reference another document, click Agregar línea de referencia (Add Reference Line).
Custom Fields
From this section you can select the custom fields registered in the Administrar module (see Custom Fields) that will be included in the document:
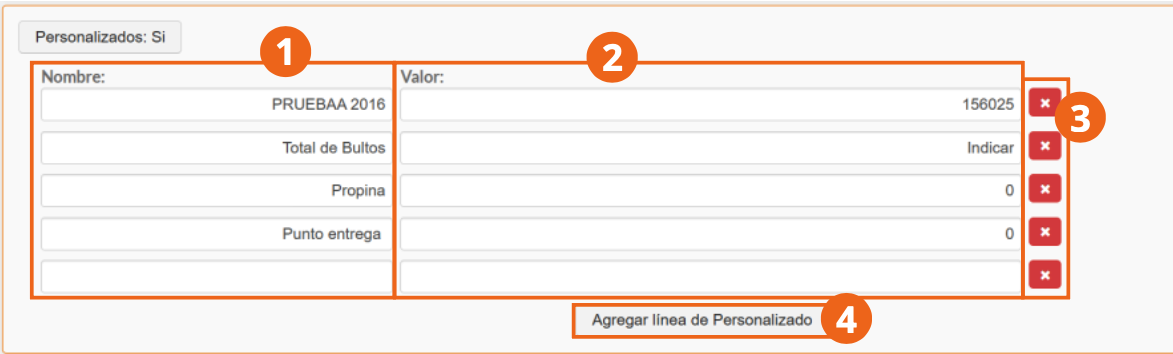
- The custom field's name is shown.
- You can verify the pre-registered value for the custom field.
- To add another custom field, click Agregar línea de Personalizado (Add Custom Field Line).
Discount or Surcharge
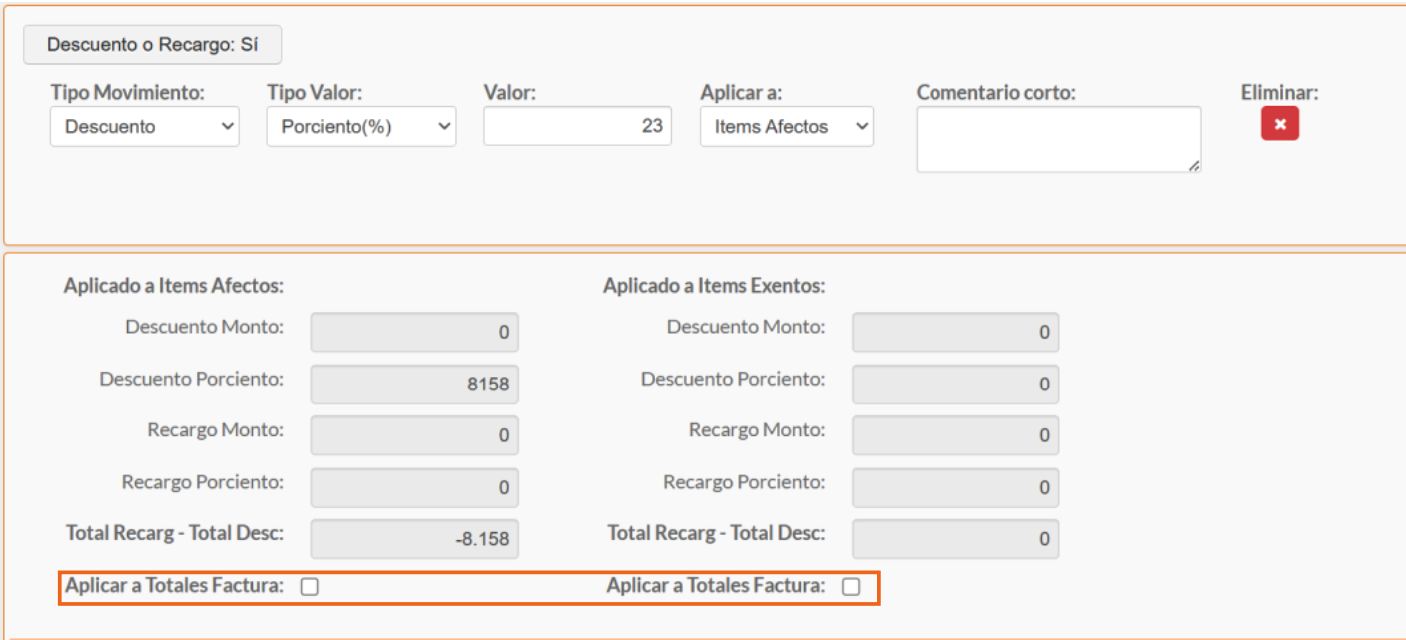
For cases where a discount or surcharge can be applied, you can enable this section by clicking the header and entering the following data:

- Select whether it is a discount or a surcharge.
- Select the currency in which the discount or surcharge will be applied.
- Select which items or articles in the document the discount or surcharge should apply to.
- Enter the value of the discount or surcharge to apply.
- You can enter a short comment about the discount or surcharge.
- To discard this change, click Eliminar (Remove).
Once this data is entered, the calculation of discounts or surcharges applied to the document is shown. For the discounts or surcharges to apply to the invoice total, click the Aplicar a Totales Factura (Apply to Invoice Totals) checkboxes.
Invoice Totals
This section shows the total sum of the document's values:
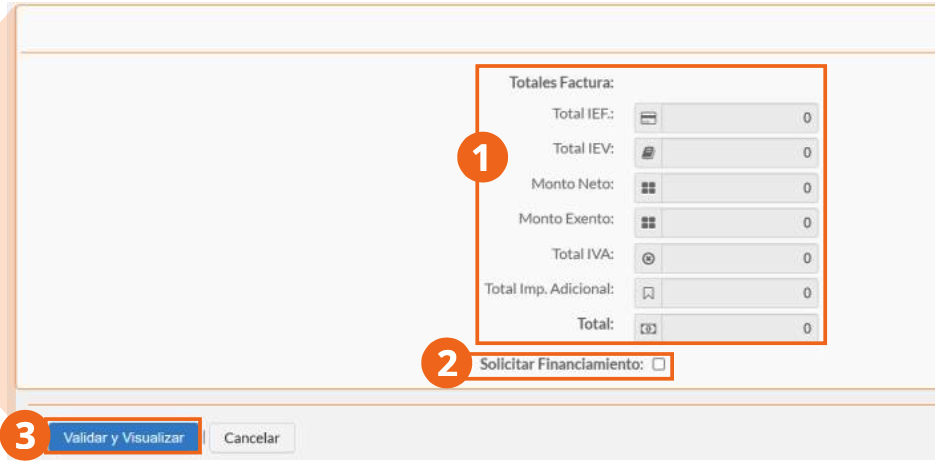
- To request financing on the document's total value, click the checkbox.
- Click Validar y visualizar (Validate and Preview).
Issued documents can be viewed from the Documentos (Documents) module. See Documents.