The Spanish version is the authoritative reference. View in Spanish
Configuration
Before starting the invoicing process, it is necessary to prepare the system: load and configure in advance all the information necessary for efficient, organized document issuance free of errors. This includes:
- Register the complete list of customers (buyers) with their tax and contact data, as well as the catalog of products or services with their descriptions, prices, units of measure, and applicable taxes.
- Define the numbering ranges of folios that will be used in the documents.
- Establish the custom fields that will be included in issued documents, to adapt the information to your business's specific needs or particular requirements.
Properly carrying out this initial configuration not only facilitates invoice issuance but also improves control, consistency, and information traceability, reducing the likelihood of administrative or tax errors in the process.
Customers-Buyers
Register a Customer
- From the main menu, go to Configuration.
- Select Customers-Buyers.
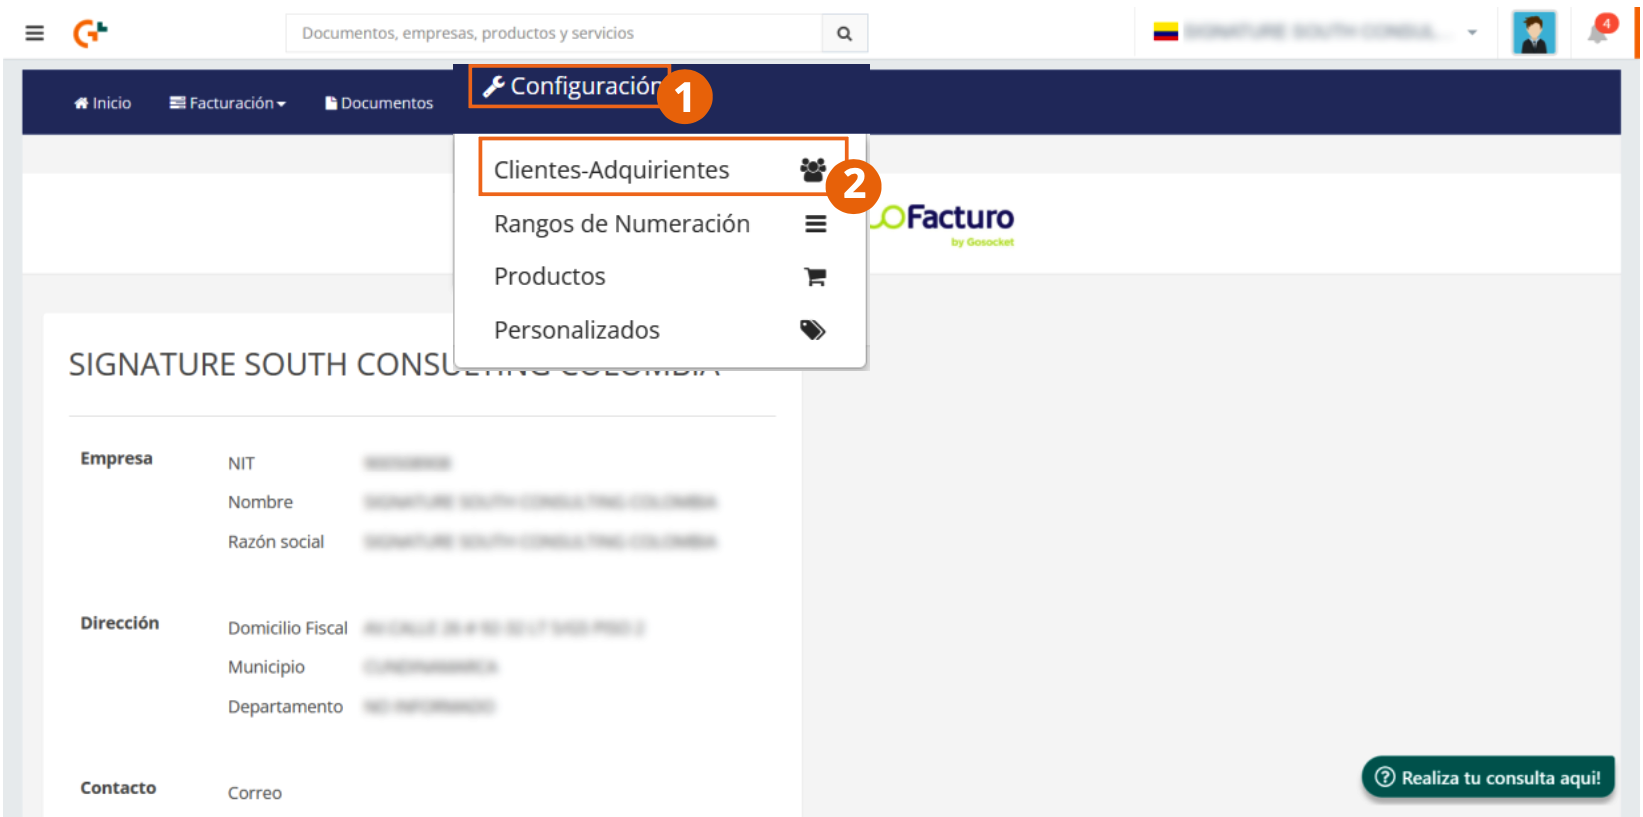
- Click the Add button.
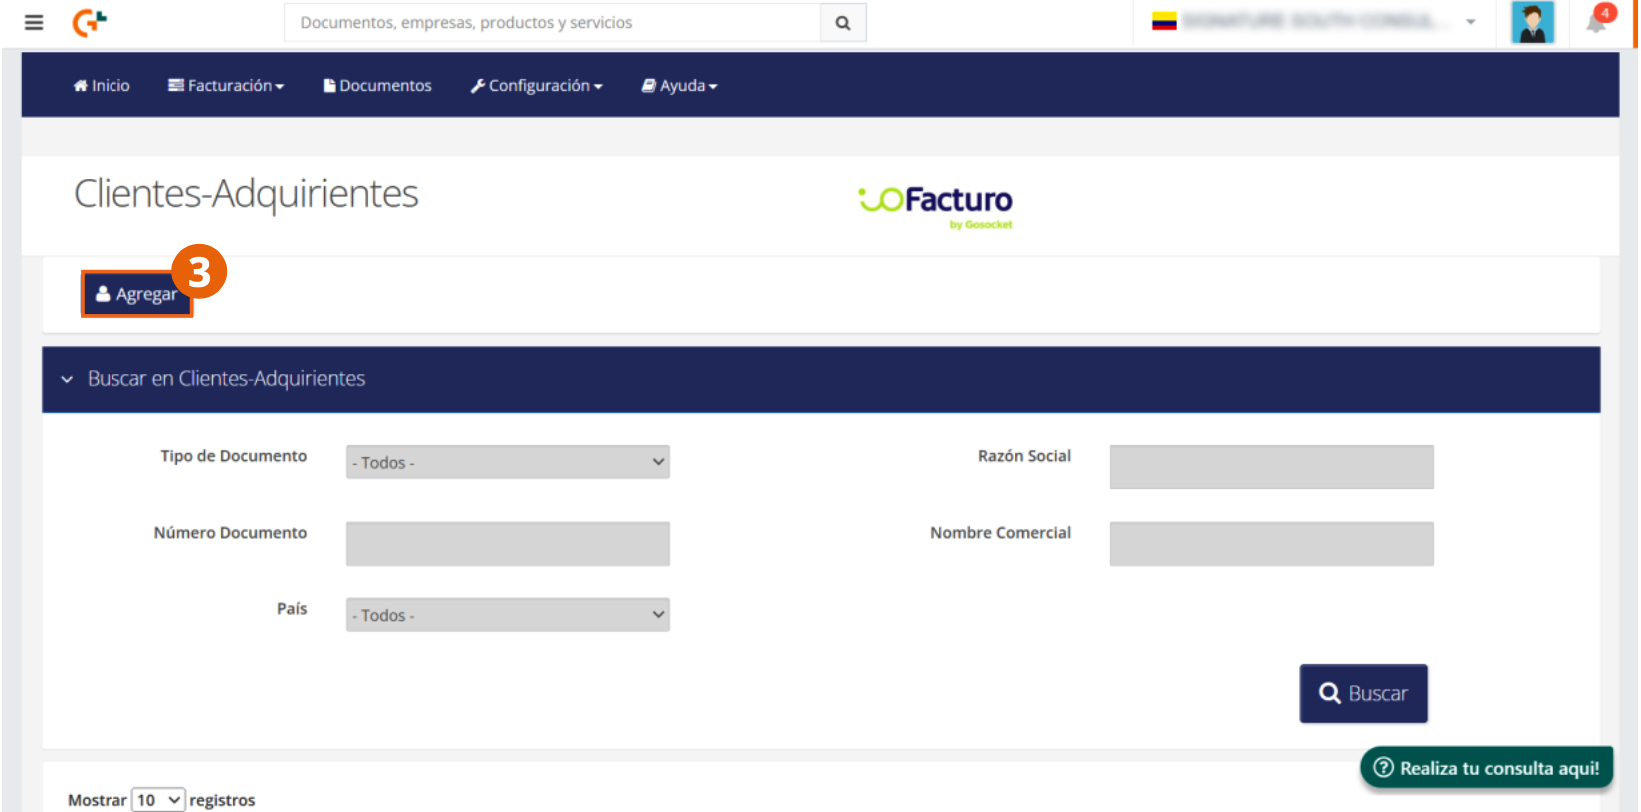
This action opens the new customer registration form, where you must enter the following information:
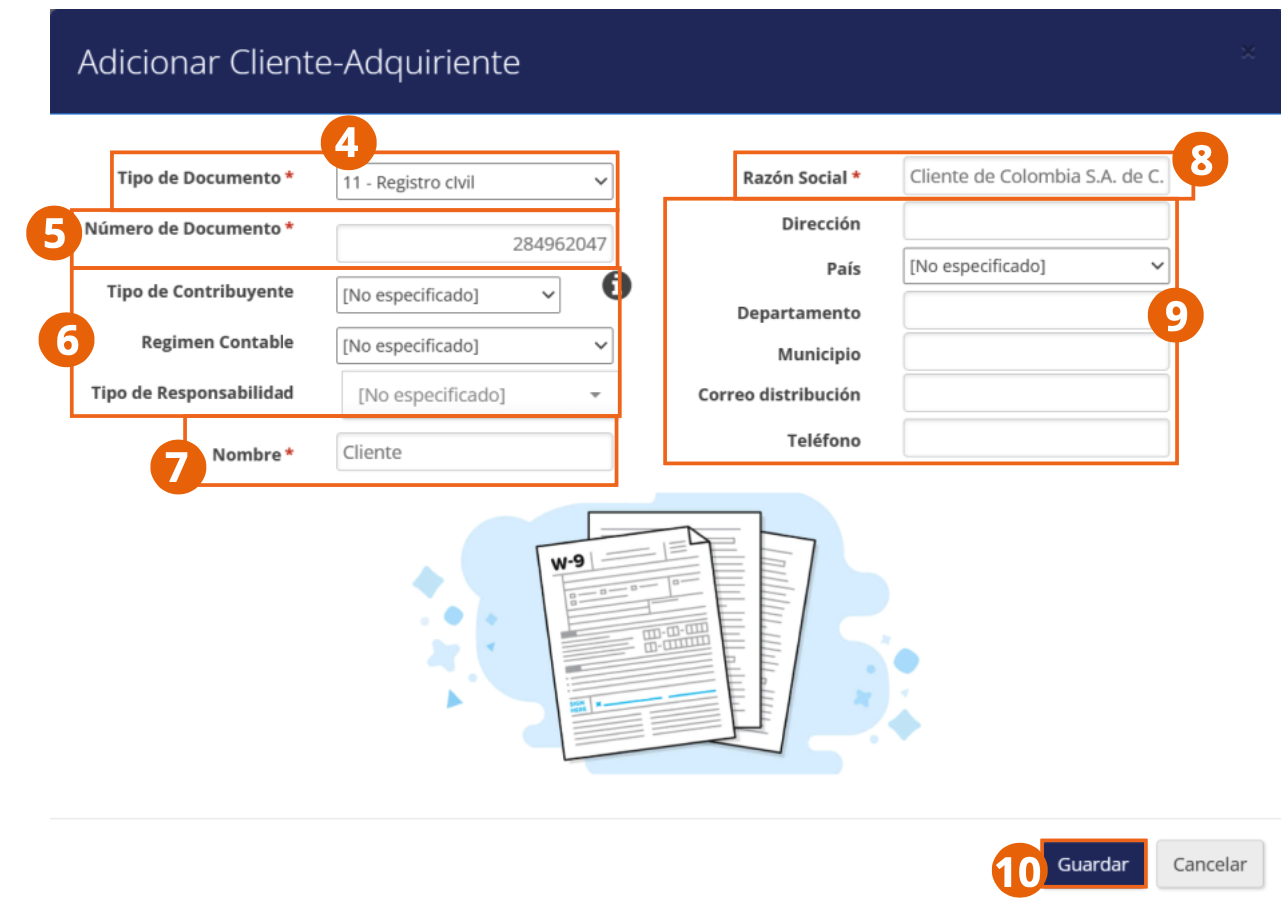
- Select the document type with which the customer is identified.
- Enter the document number of the customer's identification.
- Enter the customer's business name.
- Write the customer's legal name and indicate their tax regime (type of taxpayer, accounting regime, and type of liability).
- Capture the customer's location data (address, country, department, and municipality) and contact data (distribution email and telephone).
- When finished, click Save.
Remember that fields marked with * are required.
A notification will then be displayed indicating that the customer was registered successfully.
Search Customers
The Search in Customers-Buyers section allows you to locate a record:
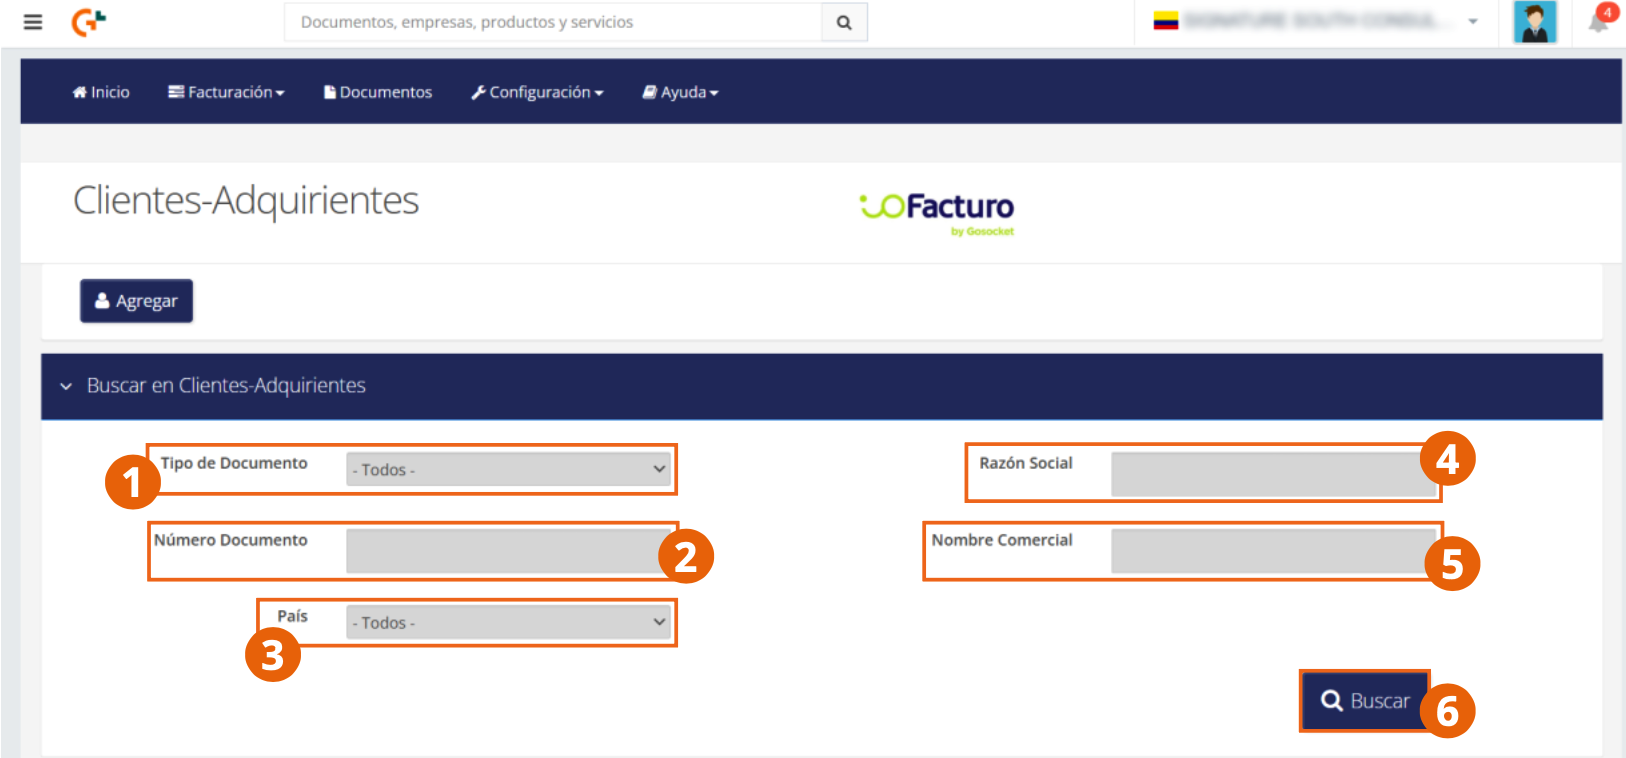
- Select the document type that was registered to identify the customer.
- Enter the document number.
- Select the customer's country.
- Write the legal name with which the customer is identified.
- Enter the customer's business name.
- When finished, click Search.
You can use all or only some of the search filters to locate a record.
Organization of the Customers List
The Customers-Buyers screen list shows the information for each record in the following order:
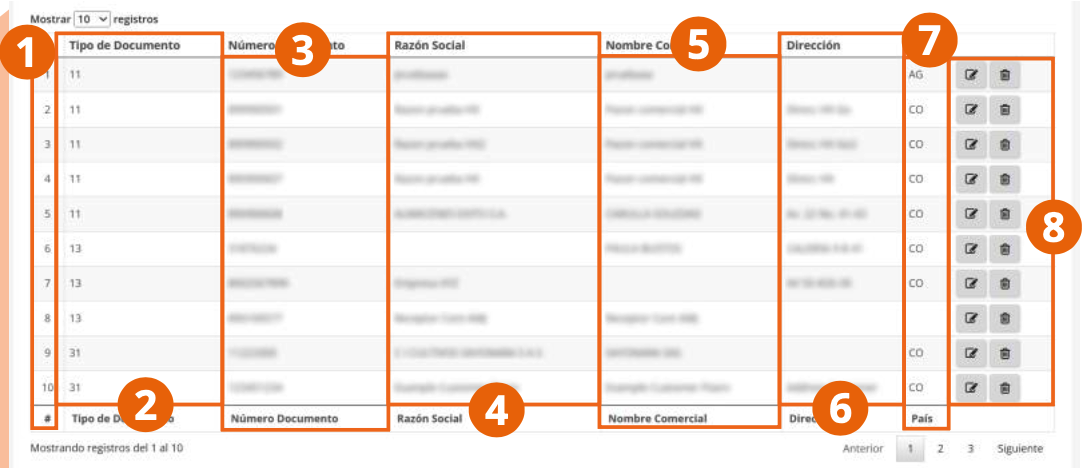
- Serial number of the customer record.
- Document type with which the customer is identified.
- Document number of the customer's identity according to their registration.
- Legal name of the customer according to their registration.
- Business name with which the customer is known.
- Address where the customer is located according to their registration.
- Country where the customer is located.
- Within the actions column, options are shown to edit the customer record and to delete it from the system.
Products
Register a Product
- From the main menu, go to Configuration.
- Select Products.
- Click the Add button.

In the new product registration form, you must enter the product information as indicated below:
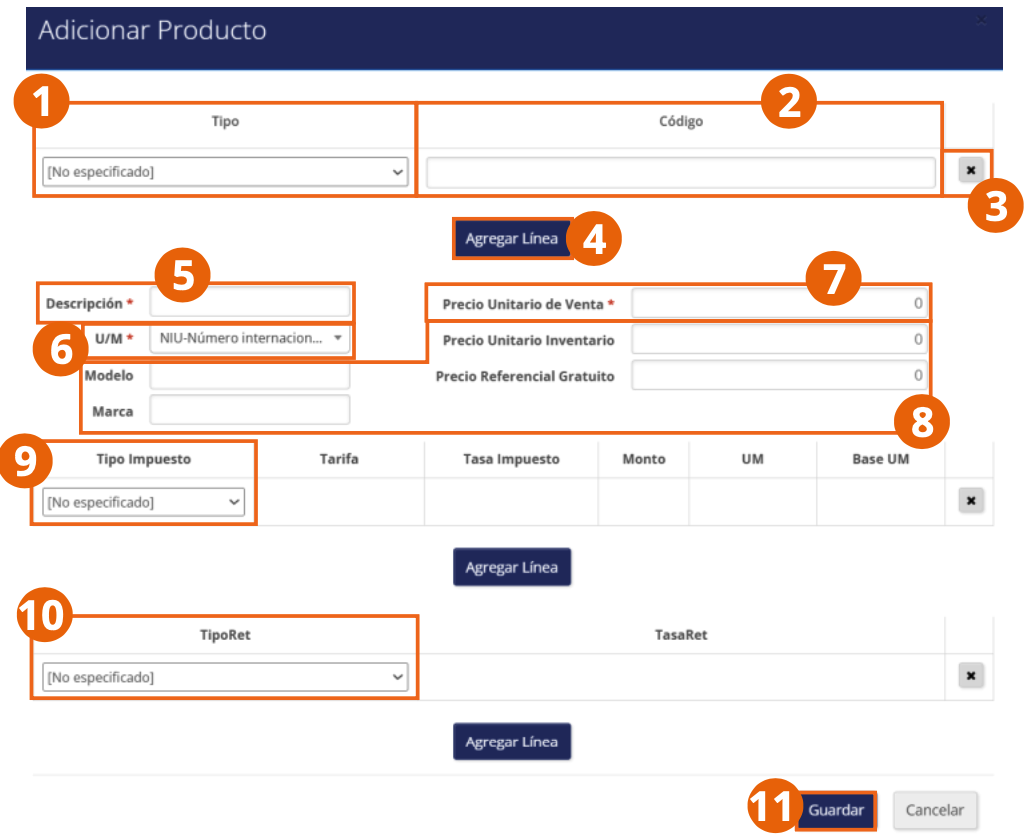
- Select the type of code with which you will identify the product and enter its code.
- Enter a description of the product.
- Select the unit of measure (U/M) by which the product is sold.
- You can add details for the product registration, such as the model and brand.
- Enter the unit sale price of the product; optionally, the unit inventory price and the free referential price.
- Select the type of tax applicable to the product.
- To enter any withholding applicable to the product, click in the available field and select the withholding. The rate will be automatically displayed according to DIAN guidelines.
- When finished, click Save.
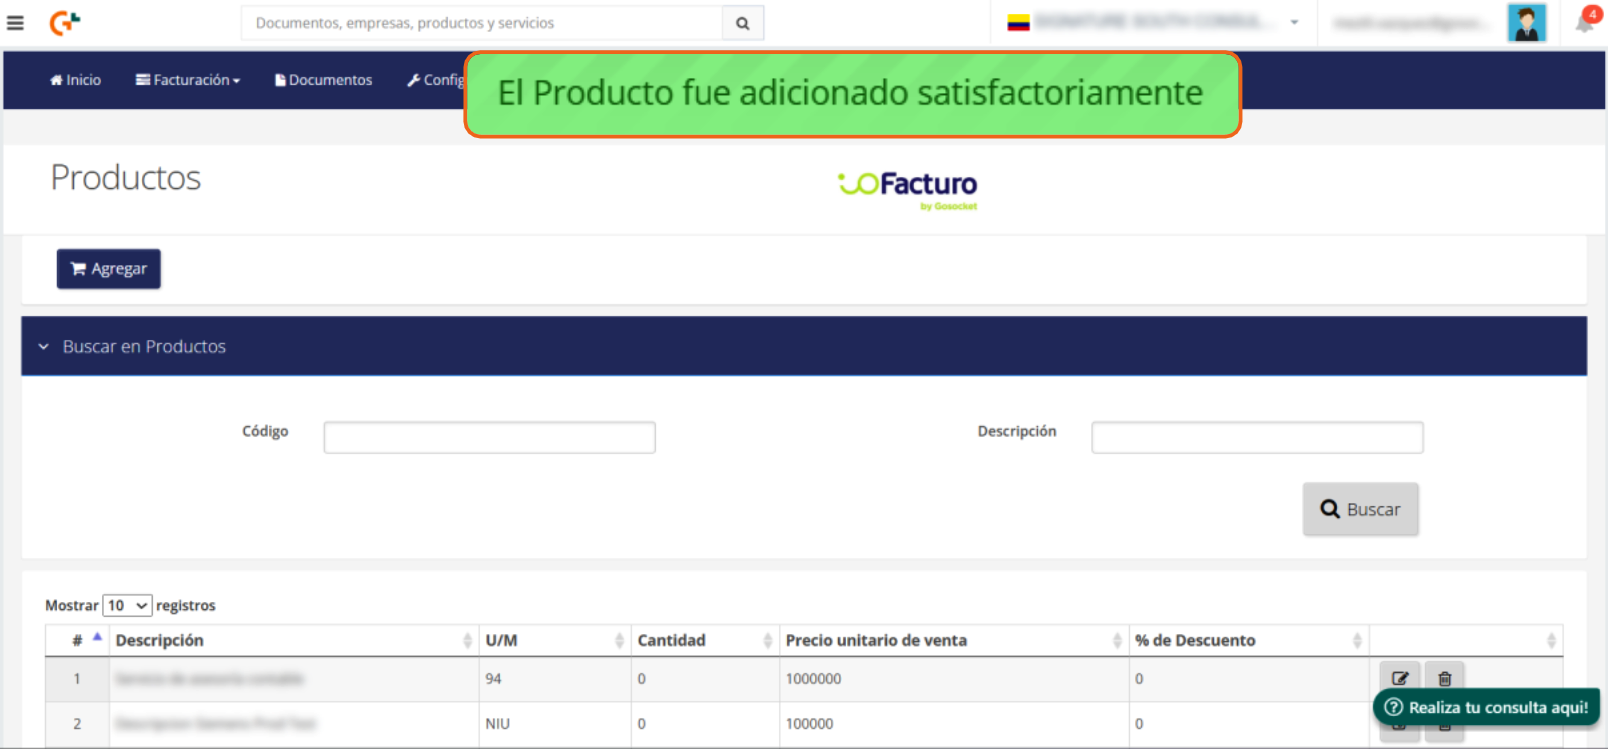
A successful product registration notification will be displayed.
Search Products
The Search in Products section allows you to locate a record:
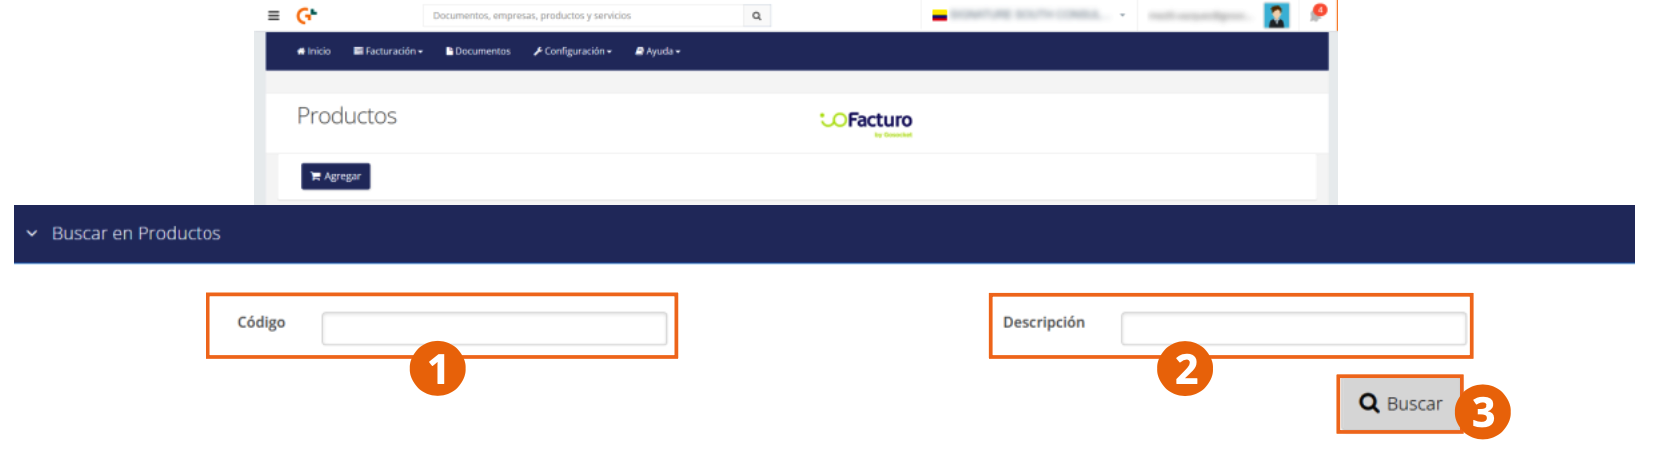
- Enter the code of the product to search for.
- Write the description of the product according to its registration.
- When finished, click Search.
You can use all or only some of the search filters to locate a record.
Organization of the Products List
The Products screen list shows the information for each record in the following order:
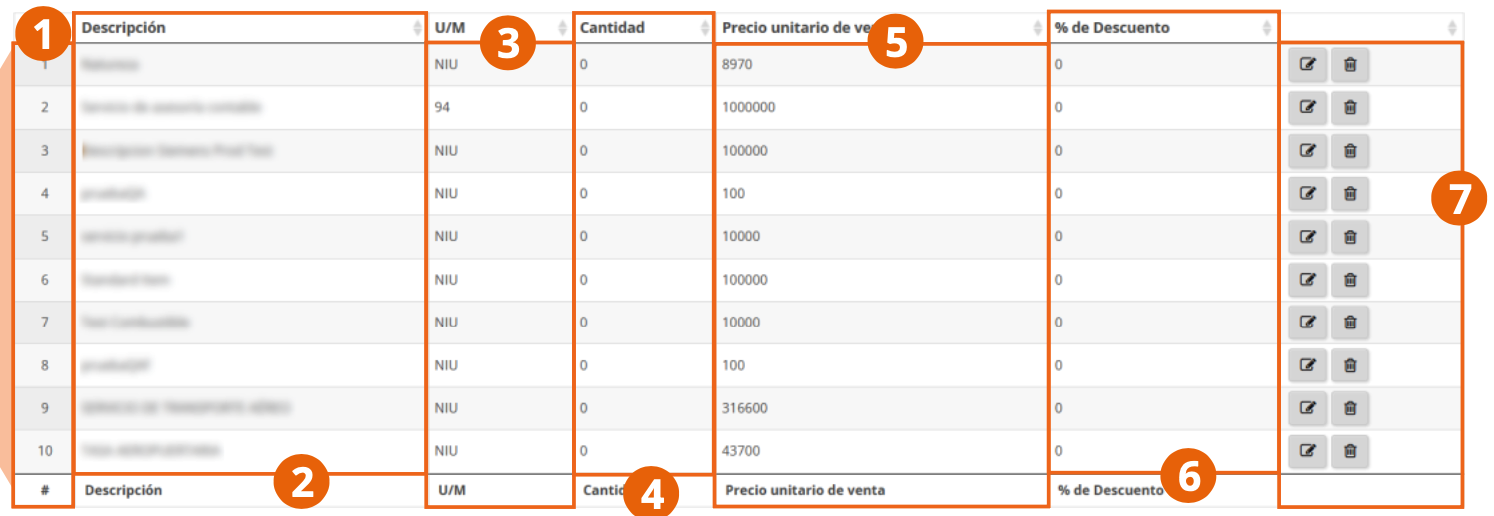
- Serial number of the record.
- Description column by product.
- Unit of measure by which the product is sold.
- Quantity of units by which the product is sold in each display.
- Price per unit of product.
- Discount applicable to the product according to its registration.
- Column with edit and delete buttons for the record.
Custom Fields
Custom fields allow you to adapt issued document information to your business's specific needs.
Register a Custom Field
- From the main menu, go to Configuration.
- Select Custom.
- Click the Add button.
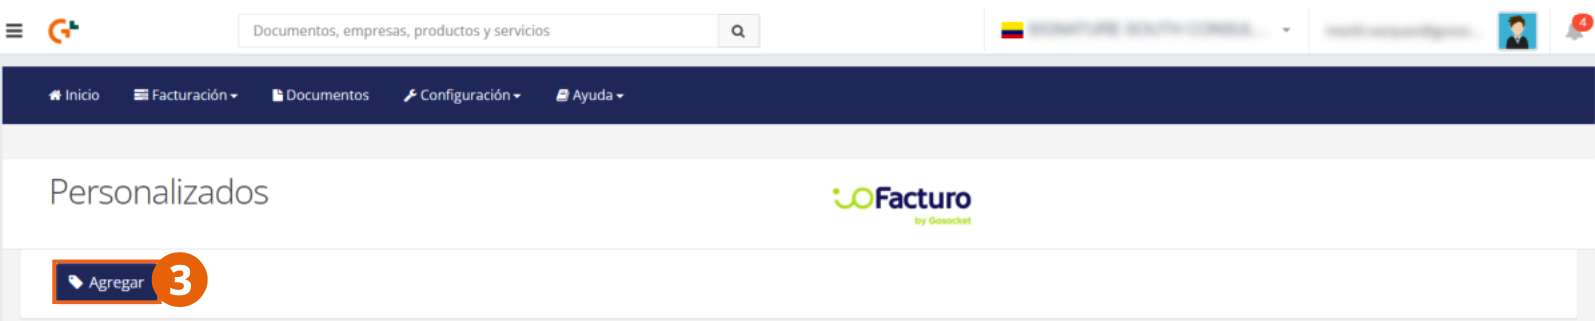
In the new custom field registration form, you must enter the information as indicated below:
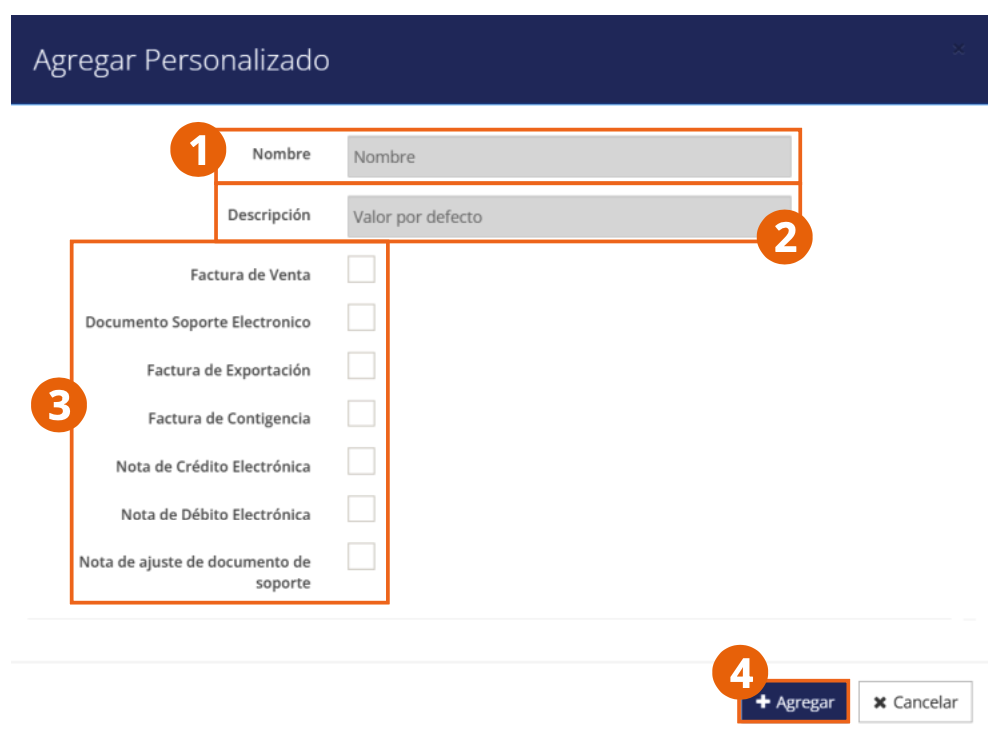
- Enter the name to identify the custom field.
- Write the description of the field, which functions as its default value.
- Check the boxes for the document types in which the custom field will be included (Sales Invoice, Electronic Support Document, Export Invoice, Contingency Invoice, Electronic Credit Note, Electronic Debit Note, or Support Document Adjustment Note).
- When finished, click Add.
A successful custom field registration notification will be displayed.
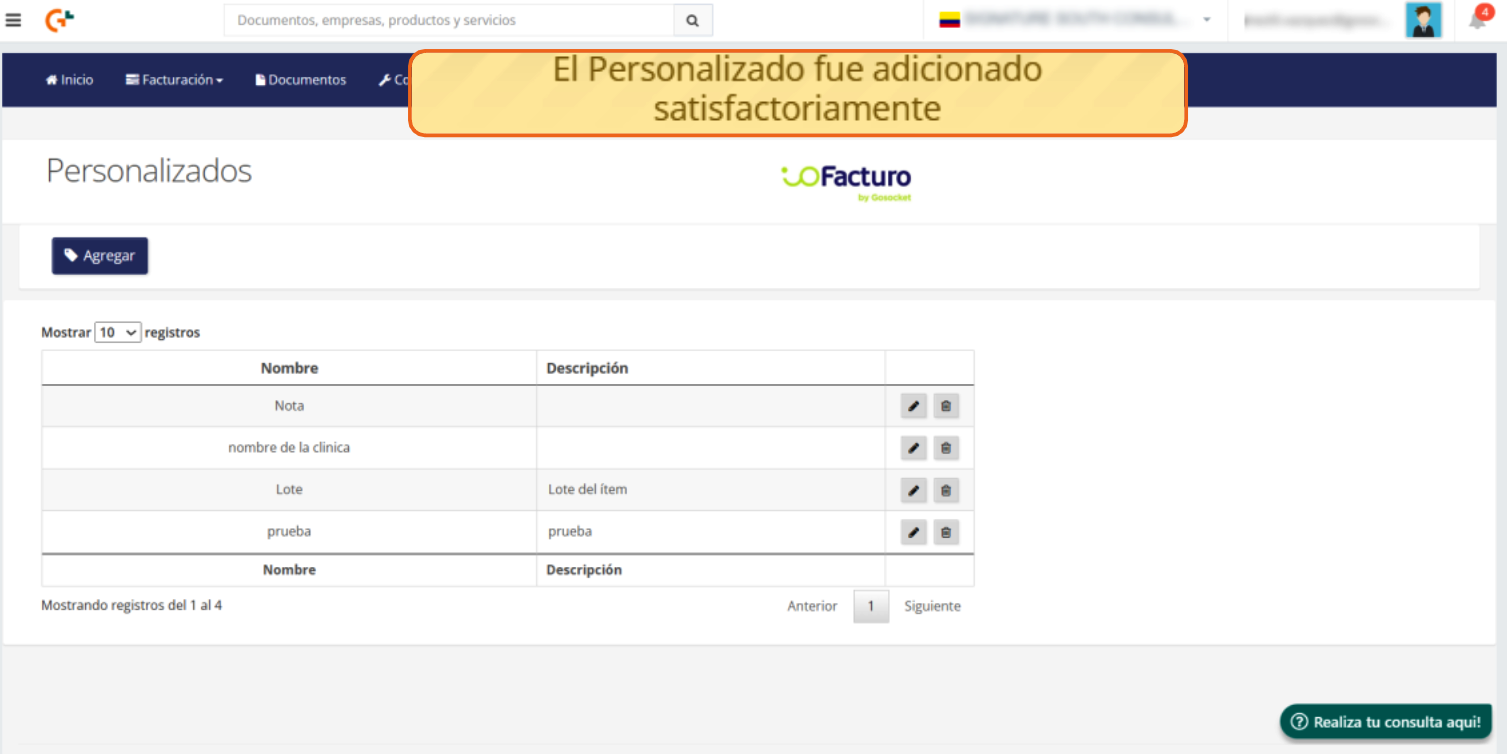
Organization of the Custom Fields List
On the Custom screen home page, we find the information for the records in the following order:
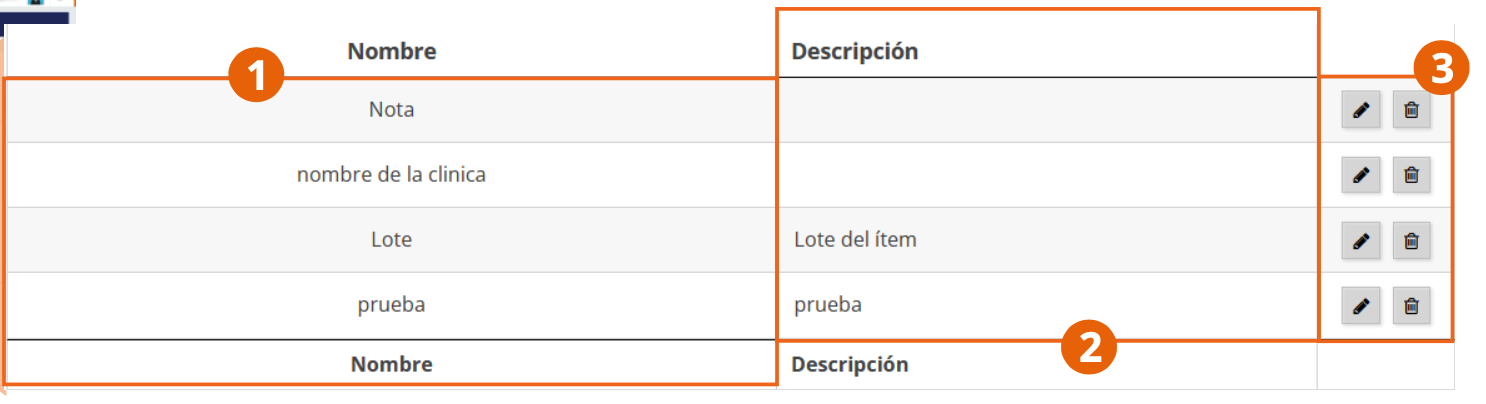
- Name to identify the custom field.
- Description of the custom field.
- Column with edit and delete buttons for the record.
With configuration loaded, you can now issue your electronic documents from the Invoicing module. See Document Issuance.