The Spanish version is the authoritative reference. View in Spanish
Ecuador: Receipt of Documents
1. OPERATION
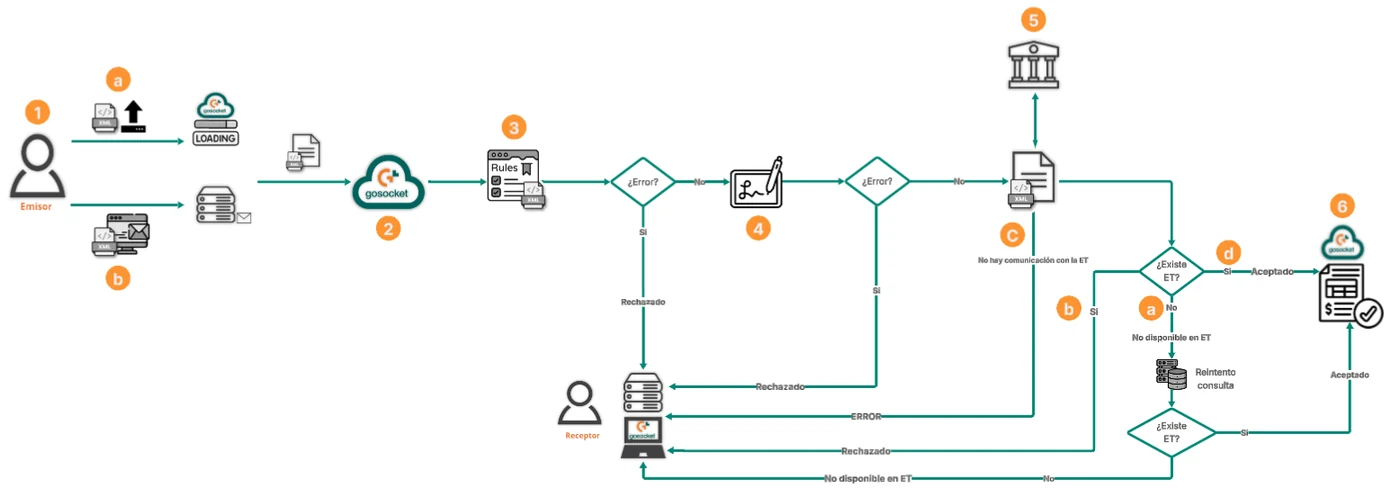
Document receipt flow for Ecuador
- The provider has the possibility of issuing the document in two ways:
- The provider manually uploads the XML through the Gosocket Upload (In the section Sending Method - Manual XML Upload the conditions that must be considered when sending are explained).
- The provider sends the XML file through the exchange mailbox (In the section Sending Method - Exchange Mailbox the conditions that must be considered for sending are explained).
Note: When the document receipt channels are used, both the exchange mailbox and the manual XML upload using the option
Upload , both processes execute the schema, signature, and validation checks against the ET (Tax Authority).
-
The Gosocket portal handles the download and processing of this document. When it is a tax document, it enters a validation flow.
-
First, a schema validation is performed on the document to guarantee that it complies with the format established by the Tax Authority. Depending on the validation performed, one of the following results can be obtained:
- Failed: The document does not comply with the tax format, so it will be registered in Gosocket with rejected status and the red exclamation symbol will be shown in the iconography
 , additionally, the reason for the rejection is indicated in the document's notes.
 - Successful: The document complies with the tax format, in which case it continues to the next validation.
- Failed: The document does not comply with the tax format, so it will be registered in Gosocket with rejected status and the red exclamation symbol will be shown in the iconography
-
The document's electronic signature is validated, in order to guarantee that it has not been altered. Depending on the validation performed, one of the following results can be obtained:
- Failed: This means that the document has been altered, so it will be registered in Gosocket with rejected status and the red exclamation symbol will be shown in the iconography , additionally, the reason for the rejection is indicated in the notes of the document's preview.
- Successful: If the digital signature validation is successful, it continues to the next validation.
- Failed: This means that the document has been altered, so it will be registered in Gosocket with rejected status and the red exclamation symbol will be shown in the iconography
-
Afterward, a query is made to the Tax Authority to check whether the document exists. From this validation, one of the following results can be obtained:
a. Document not found (Failed)

- Indicates that the received document is not registered with the ET.
- In Gosocket it will remain with the status Not Available in ET.
- On the received documents query screen (Inbox), the icon will be shown.
If the document is still not registered with the ET or there is unavailability of the query service, the automatic retries are performed as follows:
- The system performs 30 automatic attempts every 10 minutes.
- If after the 30 attempts the document still cannot be found, it will remain definitively in Not Available in ET status, showing the following icon in the Inbox.
- If the document is found during these retries, its status is updated and the process continues.
Note: For each query retry against the ET, a record is generated in the Notes section.
b. Document Rejected by the Tax Authority
If the document exists in the ET, but there is some reason for rejection by the Tax Authority, its status changes to Rejected and it will be assigned the icon
.
c. Document has an internal exception by Gosocket ❗
When performing the validation query with the Tax Authority for the document and Gosocket cannot connect with the ET service or there are communication errors with the service, the document changes its status to ERROR and it will be assigned the icon ❗ .
d. Document found in the ET
If the document exists in the Tax Authority, the receipt flow continues.
- If the result of the previous validations is satisfactory, the document is registered in Gosocket with Accepted status and the symbol
 is shown in the iconography.
a. Options Button (Reprocess document manually)
Additionally, a button was implemented in Inbox that allows manually reprocessing tax documents, that are in “ERROR” status ❗ and “Not Available in ET” .
This button allows reprocessing the different validations of the receipt process and we will find it in the following path as applicable:
- Inbox/Received/Options/Actions/Reprocess document without validating schema.
- Inbox/Received/Options/Actions/Reprocess document without validating signature.
- Inbox/Received/Options/Actions/Reprocess document.
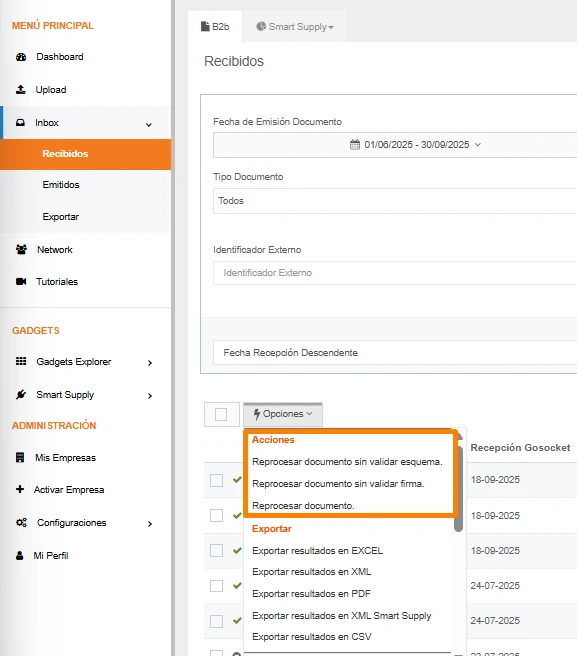
Accompanied by a selector that, as its name indicates, will allow you to independently select an Electronic Document or a set of them.
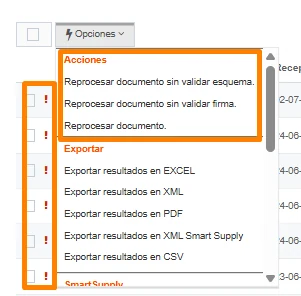
Within this menu you will find the Reprocess document option, which will allow the user to start reprocessing documents that remained in Not Available in ET
or ERROR
❗ .
Next, a pop-up window will be shown in which the user must confirm that they want to revalidate the previously selected documents.

Once the reprocessing has been generated, a record will be shown for each retry obtained from the tax authority and its record will remain in the document's preview under the notes section as we can see below:
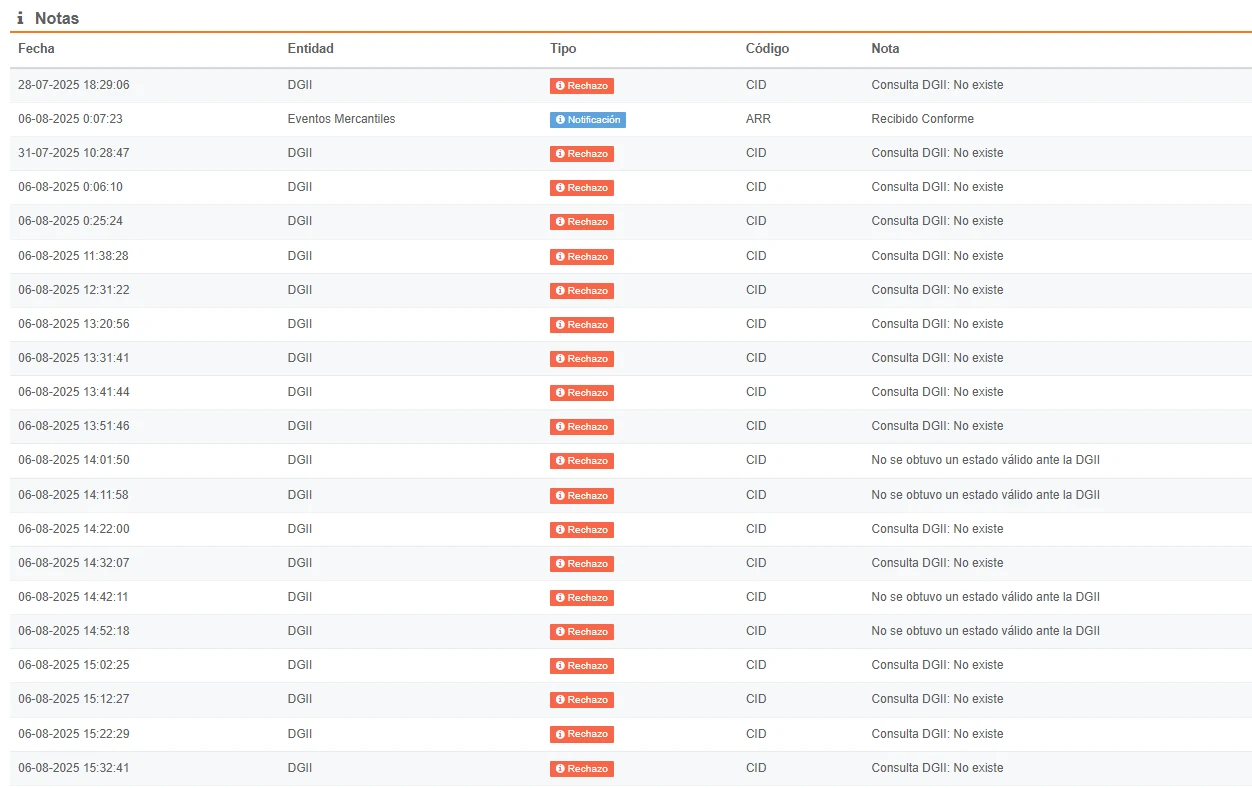
When the document changes status at the tax authority, the status icon in the received documents grid reflects this change:

2. SENDING METHOD
As already indicated, the solution performs the processing of the documents, where once the document is received, the validation process begins.
There are two ways to perform the document receipt process:
a. Manual upload of the XML through the Gosocket Upload
b. Exchange mailbox
a. Manual upload of the XML through the Gosocket Upload
Gosocket has a tool within the Inbox platform, through which the provider can upload the document's XML file.
The access path is as follows: Main Menu > Upload > Manual Upload.
In this option, the user can select the XML file manually from the file explorer or, if preferred, drag it directly into the Manual Upload interface.
As already indicated, the solution performs the processing of the documents, where, once the document is received, it begins with the validation process.
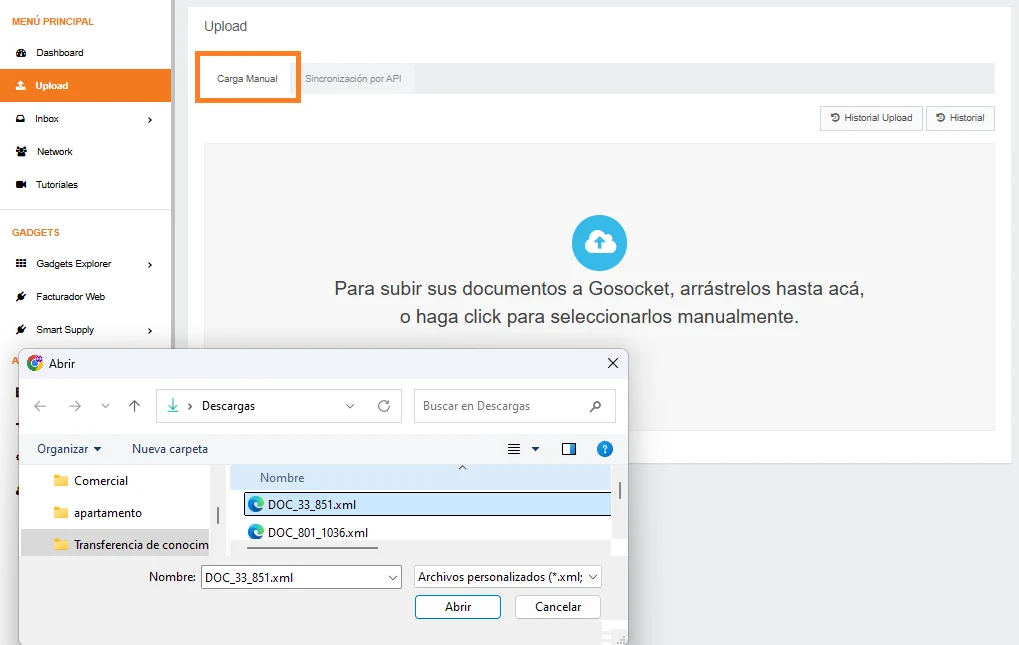
Once the XML file is received through the manual upload option, it will identify:
- How many XML files in total were received, how many were processed successfully and how many have errors.
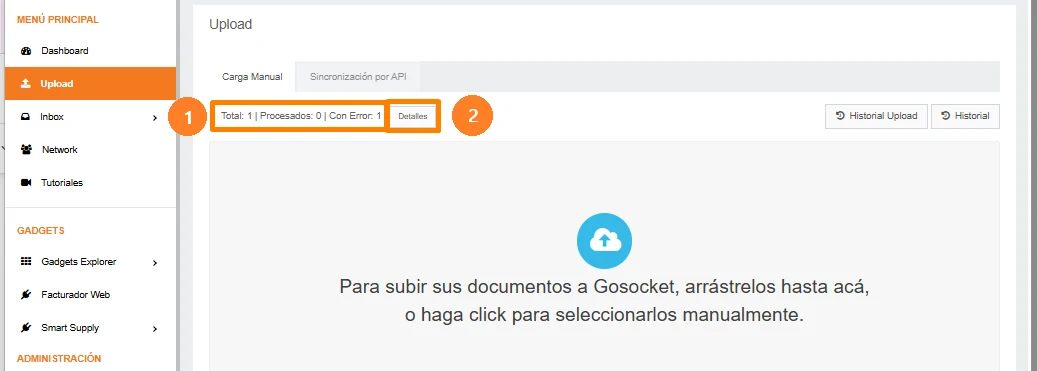
- When clicking the button “Details” a popup will be shown with the “Error Details” identifying the possible errors that the XML file uploaded manually through this option may contain, and otherwise, if the document has no errors, a detail will be shown that it was uploaded to the Gosocket platform successfully:

- Finally, the document will be displayed in the received tray of Inbox, with all the validations performed.

i. Considerations for manual upload of the XML
- In a single upload, up to n XML files can be uploaded.
- The same validations of schema, signature, availability with the Tax Authority and certificate that are performed through the exchange mailbox will be carried out.
- The tax documents stipulated by the Tax Authority must be sent in XML format.
The tax documents that can be received are:
- Electronic invoice.
- Credit Note.
- Debit Note.
- Settlement.
- Waybill.
- Withholding Certificate
b. Exchange mailbox
The mailboxes to be used are:
- Sandbox: ec_sbx@inbound.gosocket.com
- Production**:** ec@recepcionprd.gosocket.net
i. Considerations for the exchange mailbox
It is important to keep the following points in mind for sending documents, since this will prevent them from being rejected by the application.
- The tax documents stipulated by the tax authority must be sent in XML format.
The tax documents that can be received are:
- Electronic invoice.
- Credit Note.
- Debit Note.
- Settlement.
- Waybill.
- Withholding Certificate
- They can be sent individually or several XML files in the same email.
- Several compressed XML files can be sent (.zip, .rar)
- The XML or compressed files must be attached to the main email.
- Attached documents can be sent, such as the invoice PDF.
The solution has the possibility of performing the processing of the graphic representation PDF in case this comes and attached documents that arrive at the mailbox where once received they are stored, associating them to their respective document, allowing the download within Inbox.
The process must work as follows:
If an XML document arrives at the mailbox and additionally a PDF file with the same name, for example: Invoice12345.xml, Invoice12345.pdf, it is understood that the .pdf file is the graphic representation of the DTE, so it is synchronized that way in Gosocket and is available for consultation.
- If an XML document arrives at the mailbox with more than one attached file of any extension, they are associated as attached documents.
Note: If there are PDF files with a name different from the XML, they will be considered as attached documents.
- For sending attachments, it is recommended to send each DTE with its attachments separately, since in case more than one XML document arrives, only the storage of the graphic representation will be performed as long as the PDF file contains the same name as its corresponding XML, the rest of the attached files will not be processed, since there is no way to know which document to associate them to.
- Attachments can also be associated after the sending of the XML, for example, if the sending of the XML is performed without attachments, another mail with attached documents (PDF, Excel, Word, etc) can be sent afterward and these will be associated to the previously sent document, as long as the second mail also includes the XML.
3. QUERYING RECEIVED DOCUMENTS FROM GOSOCKET
Once the documents were processed by the receipt service, these can be queried from the Gosocket portal in the Inbox/Received section. **
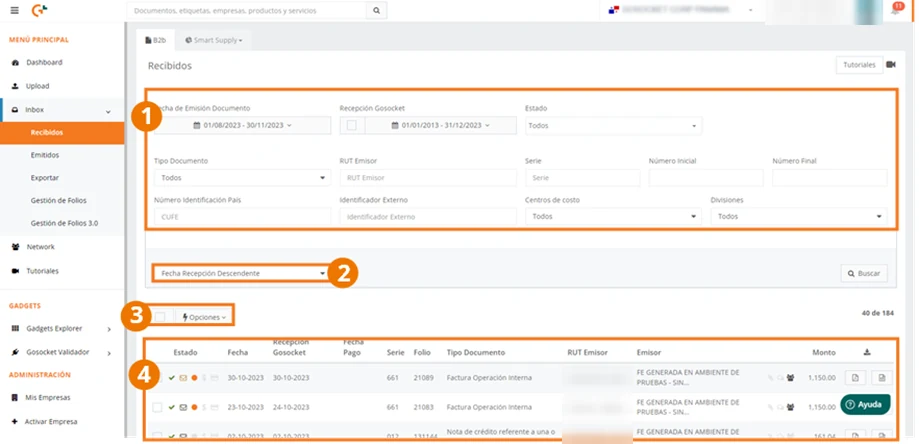
This section shows the following screen:
- Filters section to optimize the search result. **
- Display order control, with which you can modify the way the search results will be presented. **
- List of options linked to export, commercial responses and internal movements of the Electronic Documents. **
- Display section with the detail of the search result and representative iconography of the most relevant status changes. **
* For more information about these points, see the Inbox documentation.**
Once the document search is performed in the main grid, the list of received documents that met the established search criteria will be shown, in this grid, in addition to relevant document information, the document status can be observed.

- Tax Authority validation .
- Distribution validation.
- Smart Supply status validation.
In the status column (1), the result of the applied validations will be shown, as explained in the section Operation.
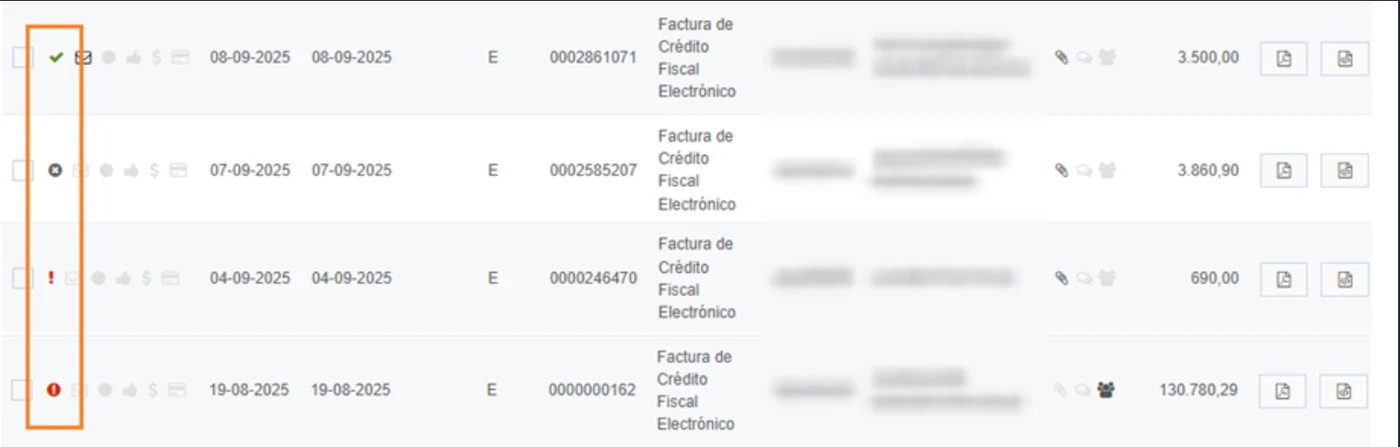
| Icon | Status | Validation |
|---|---|---|
| VALIDATED | Document approved by the ET |
| REJECTED * | Document rejected by the ET |
| Not Available in ET | Document does not exist in the ET |
| ❗ | ERROR * | Document Rejected or internal exception by Gosocket |
Note: By clicking on the document, the document's preview will open where you can review the notes related to the reason for rejection.

Note: for the case in which the document remains in “ERROR” status, the user will be able to reprocess it through the actions, with the objective of performing again the validations of schema, signature or ET. This process is explained in detail in the section “Options Button (Reprocess document manually)”.

Finally, if additional documents were sent in the mail, these will be reflected in the “Attachments” section within the document's preview.

For more information about the options available in this section, see the Inbox manual.