The Spanish version is the authoritative reference. View in Spanish
Use case: Document with Accepted Smart Supply status
This page is part of Inbox and Smart Supply. Other use cases: Pending · Rejected.
1. Requirements a document must meet for Smart Supply validations to apply
Before looking at the practical examples, let's review the four fundamental requirements a document must meet before Smart Supply validations are applied:
a. The initial reception process takes place when documents enter the Gosocket Inbox through the Exchange Mailbox, the API or the Manual Upload channel (Upload), becoming available in the Received tray.
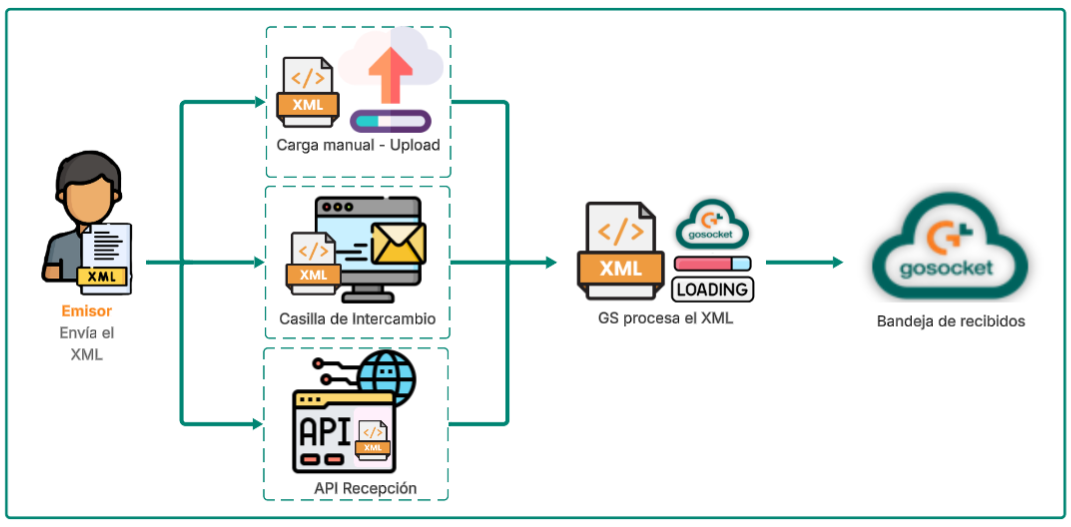
For more details on the reception process in Gosocket, see Manual document upload.
b. The document must successfully pass the mandatory tax validations of Schema, Signature, and validation with the Tax Authority.
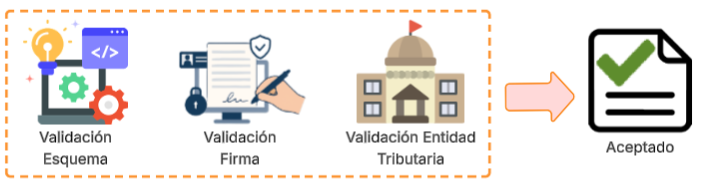
c. Only after meeting the two previous requirements will the document be displayed in the Inbox grid with the verification icon and the VALIDATED label, as shown in the image:

d. In addition, both the invoice and the Purchase Order must be available in the Gosocket Inbox tray.
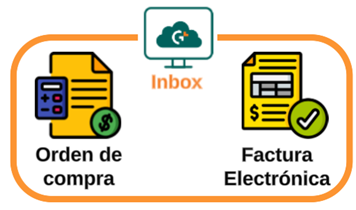
Note: if the document does not pass these reception validations, the rejection icon and the REJECTED label will be displayed in the Inbox grid

and it will not be assigned any Smart Supply traffic light color; that is, no validation will be applied to it, as shown below:

For detailed information on the different statuses of a document in Smart Supply, see Document statuses in Smart Supply.
2. Use case description: when a document ends up in Accepted Smart Supply status
Next, we will explore how Smart Supply automates a fundamental business requirement. Use case: "Validate that the invoice total amount matches the purchase order total amount".
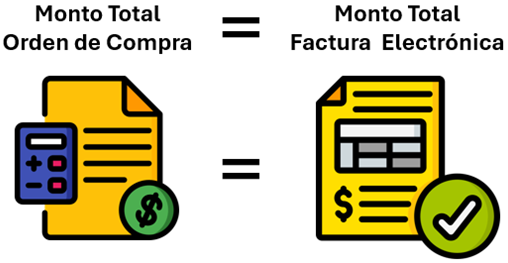
Where:
- Company B issues a purchase order to Company A for a total amount of $100, and
- Company A issues an electronic invoice to Company B for a total amount of $100.
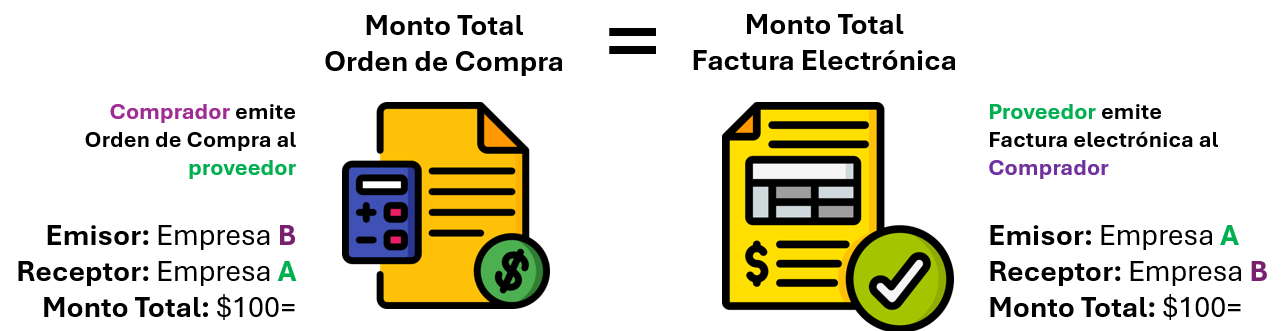
Once the electronic invoice and the purchase order have been sent, both the supplier and the buyer can view both documents on the Gosocket platform.
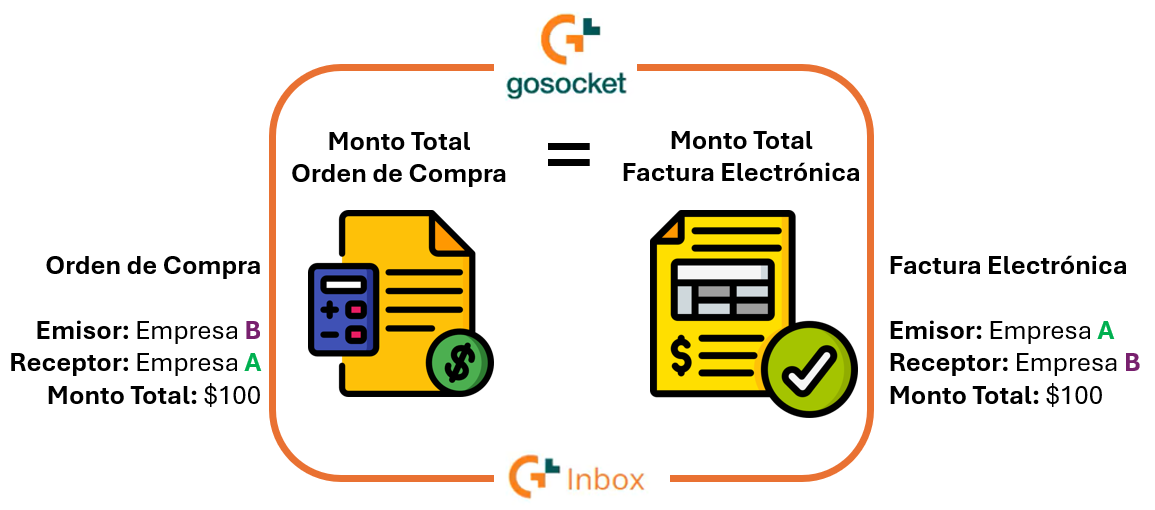
In this segment, we will break down the Smart Supply configuration to understand how the business rules define the document flow in Inbox.
With the above in mind, the document flow through the Smart Supply validations can take two paths: the successful path and the unsuccessful path.
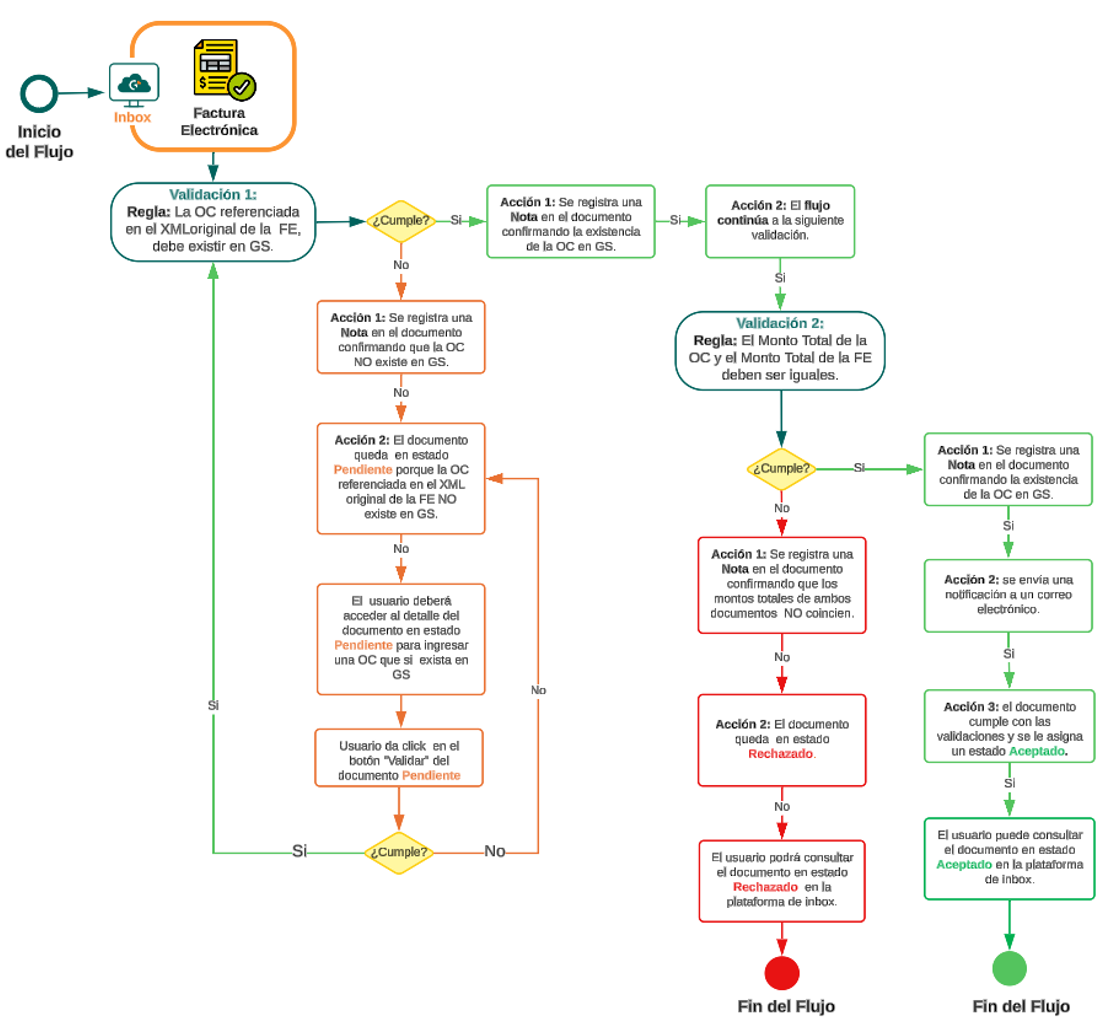
We have already identified the complete flow where the document ends up in PENDING status.
For more details on the flow of a document that ends up in PENDING Smart Supply status, see Use case: Document with Pending Smart Supply status.
We have also identified the complete flow where the document validations are not met and the document ends up in REJECTED status.
For more details on the flow of a document that ends up in REJECTED Smart Supply status, see Use case: Document with Rejected Smart Supply status.
Let's now look at the step-by-step flow when the invoice meets all the business rules (successful path).
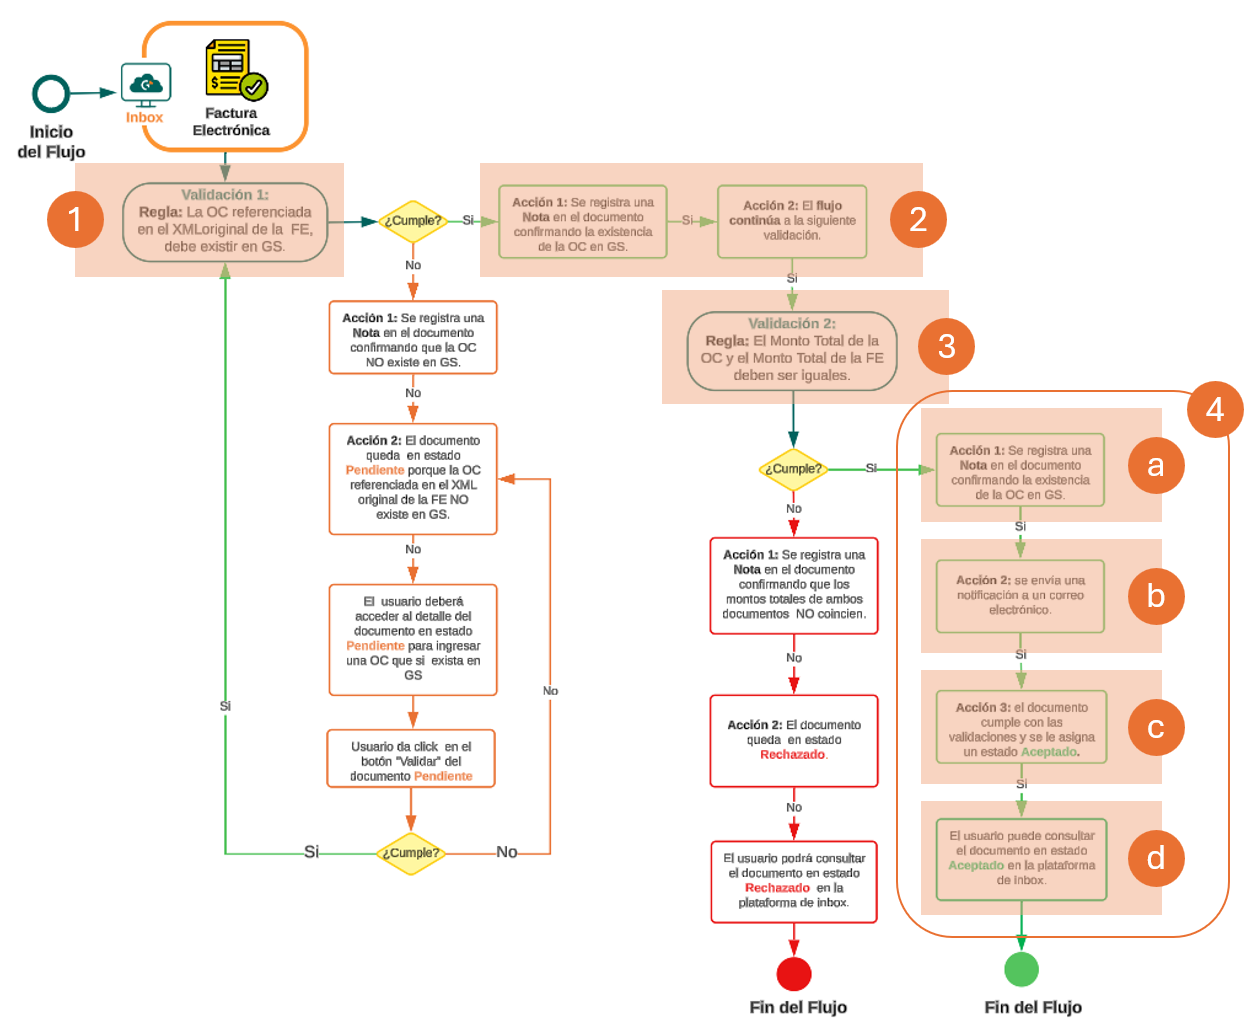
The first validation checks that the purchase order exists, and the rule is: the PO referenced in the original XML of the invoice must exist on the Gosocket platform.
If the rule is met, Smart Supply executes the first action: recording a note on the document confirming that the PO exists in Inbox. Immediately afterwards, the second action is executed, in which the document moves on to the second validation.
Now, the second validation compares the total amounts of both documents. The rule to be executed is: the PO Total Amount and the EI Total Amount must be equal.
If the rule is met, Smart Supply executes three final actions:
- First action: it records a note on the document confirming that the PO and EI total amounts are equal.
- Second action: it sends an email notification to the configured email addresses.
- Third action: it assigns the document the terminal status ACCEPTED.
Finally, the user can view the document in ACCEPTED status in the Inbox Received tray.
Based on the flow we have just described, we will now explore the different tools and features we can interact with in Inbox when a document is in ACCEPTED status:
- View a document in ACCEPTED status.
- View the Smart Supply XML in Inbox.
- View the key fields of a document.
- View the Notes section of a document.
- View the notifications configured in Smart Supply for a document.
We describe each of them below.
3. View a document in ACCEPTED status
The document in ACCEPTED status, which corresponds to our success case, can be verified in two main ways on the platform:
a. In the Received tray: in the Inbox grid, the third icon (the Smart Supply traffic light) will be displayed in Green, as shown in the image.

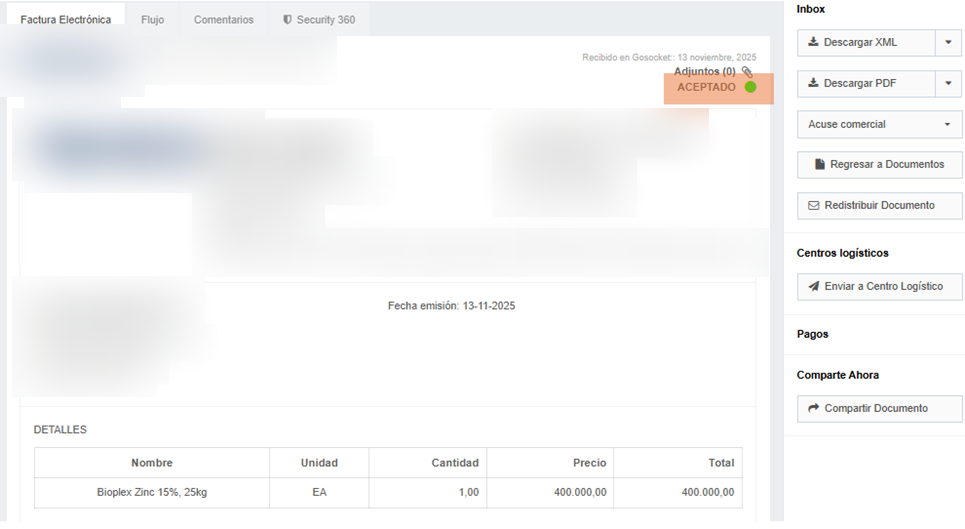
b. In the document preview: when opening the document from the Inbox grid, the status is confirmed in the upper right corner of the screen, where the ACCEPTED status will be clearly indicated together with a Green indicator.
4. View the Smart Supply XML in Inbox
4.1. What is the Smart Supply XML?
The Smart Supply XML is a copy of the original XML that the supplier sent to the platform. However, this XML is not a valid tax document. This is because, during the validation process, the original XML is modified with additional data generated by Smart Supply, which invalidates its original electronic signature. It therefore becomes an XML for internal use with no tax or commercial validity.
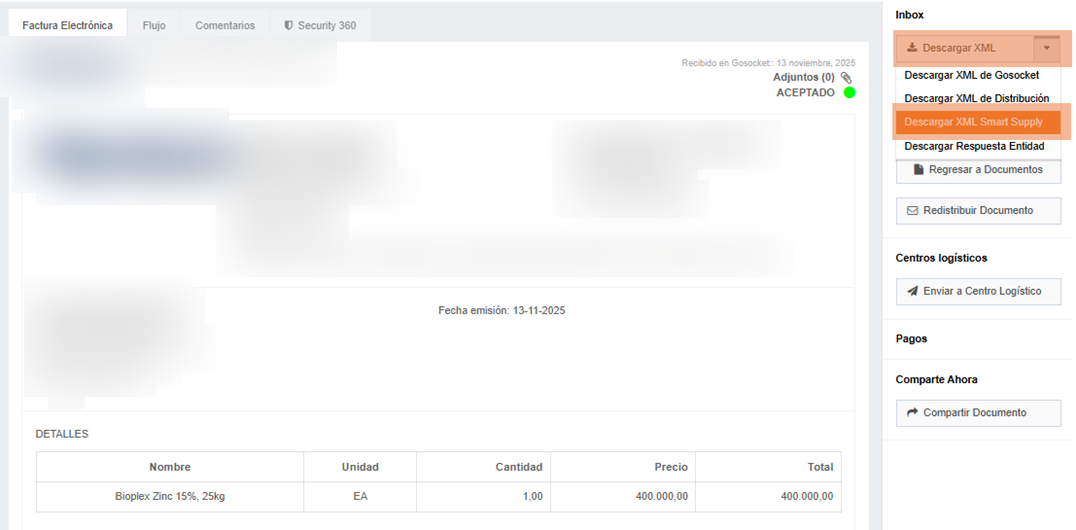
Once the document has reached a final status, such as the ACCEPTED status in our successful example, we can view and download the Smart Supply XML in two ways:
a. Directly from the document preview, in the right-hand menu: expand the Download XML button and select Download Smart Supply XML.
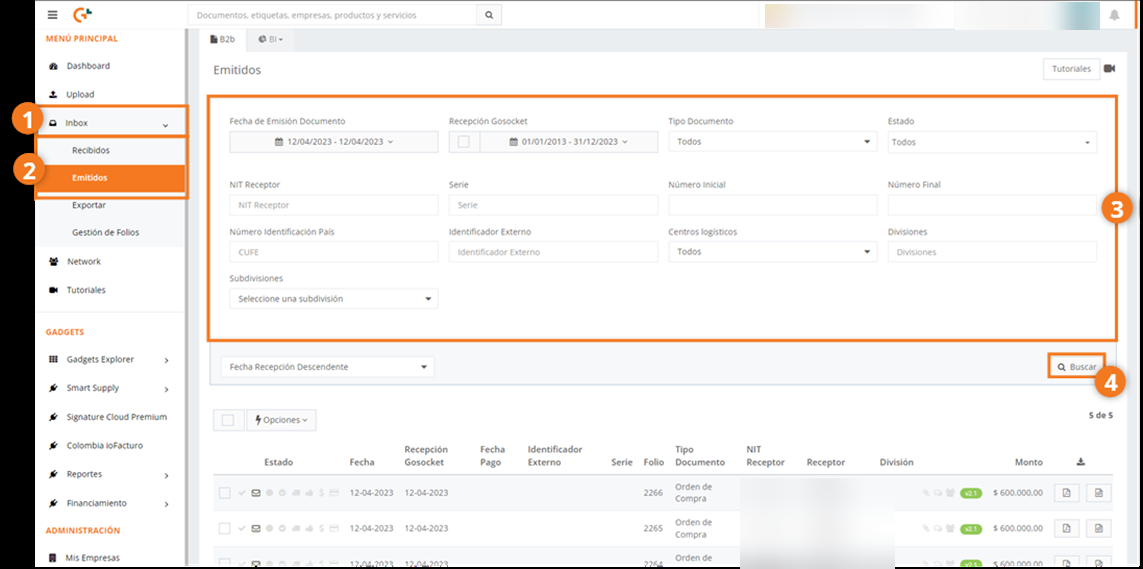
b. From the Gosocket Inbox, you can download the Smart Supply XML, which contains information about the validations configured in Smart Supply. To download it, follow these instructions:
-
Go to Inbox.
-
Select Received or Issued.
-
Set the filters that match the characteristics of the documents whose Smart Supply XML will be downloaded.
-
Click Search.
-
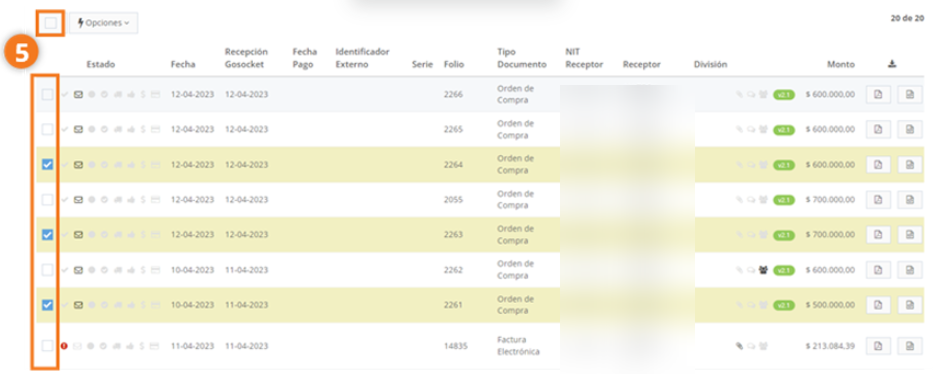
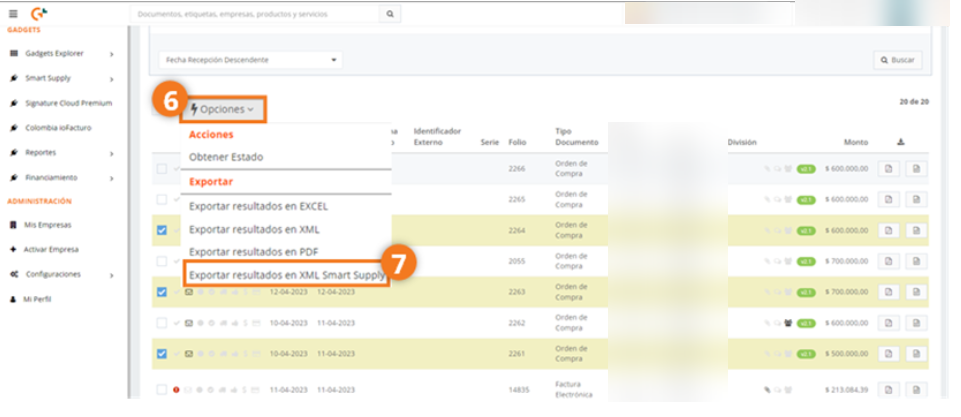
Select the documents to be included in the XML. You can also select all documents using the checkbox shown to the left of the Options button.
-
Click Options.
-
Select Export results in Smart Supply XML from the Export section.
-
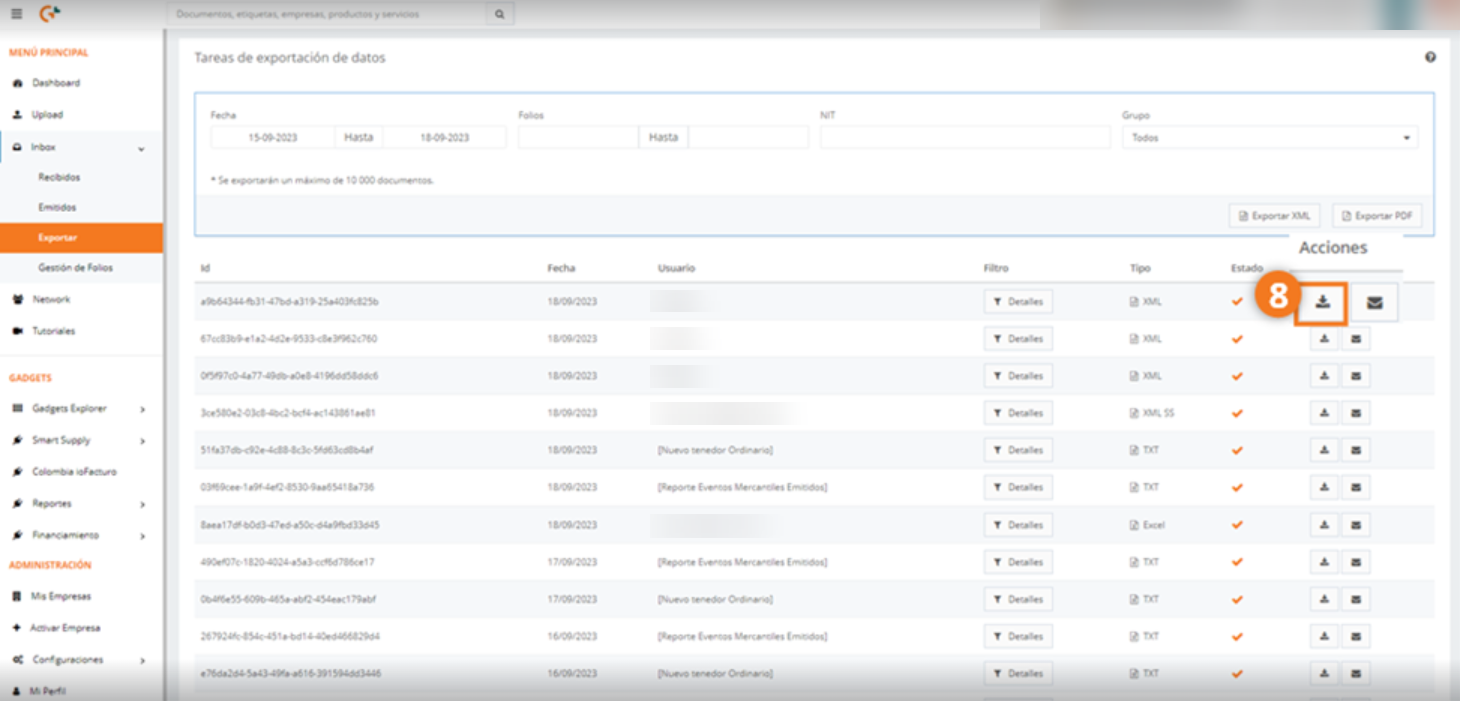
The Export module will open. To download the XML containing the previously selected documents, click the download button in the Actions column.
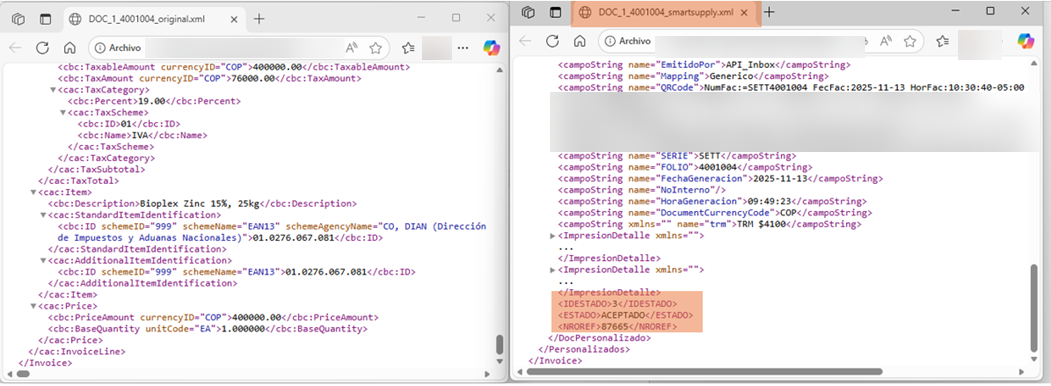
When downloading the Smart Supply XML, it can be identified by the following file name structure:

Unlike the original XML, which can be identified by the following structure:

If you compare the original XML with the Smart Supply XML, you will notice that the Smart Supply XML has additional fields, such as the final Smart Supply status of the document, that do not exist in the original file.
5. View the key fields of a document
Another important feature we can check in the document detail, once it has reached ACCEPTED status, is the key fields.
5.1. What are key fields?
A key field is relevant, specific information that the client wants to see highlighted in the document preview. In our example, the document's issue date and the purchase order number are configured.
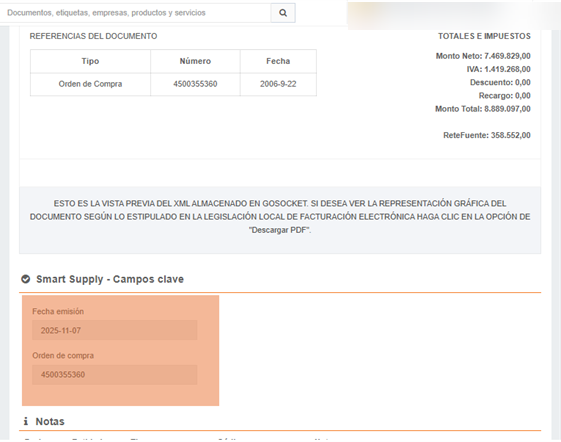
This information is extracted directly from the Smart Supply XML and displayed in the document section "Smart Supply - Key Fields".
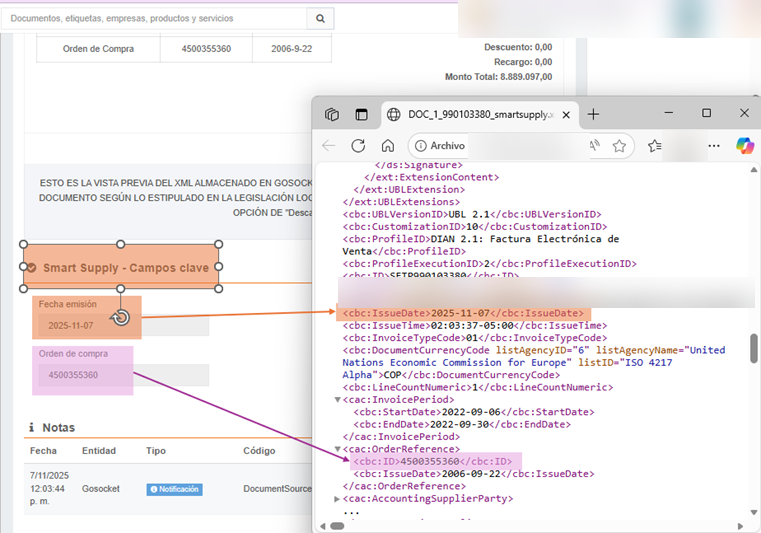
Key fields are only displayed if the required information is present, either in the original XML or because it was written to the Smart Supply XML during the validation process.
6. View the Notes section of a document
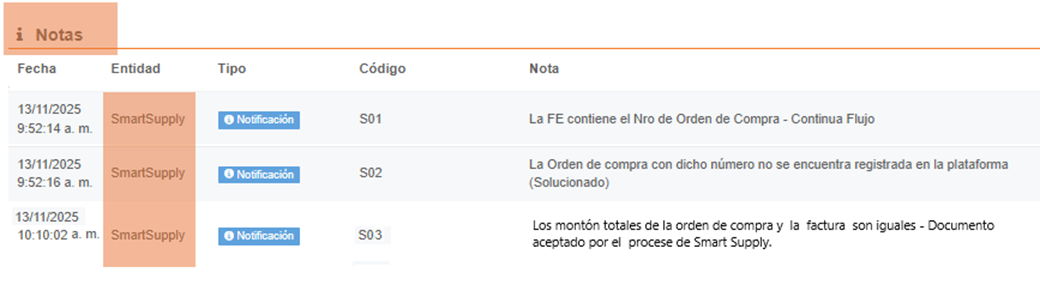
Below the key fields section, we find the Notes section. This section is essential, since it lets you check the complete traceability of all the Gosocket processes executed on the document.
Following our example of the document that ended up in ACCEPTED status, in this section we can see, under the Entity column, all the interactions performed with Smart Supply.
The following image shows the traceability of the Smart Supply flow, where the actions executed were recorded step by step:
- Validation 1 record: a record was made of the validation confirming that the purchase order is referenced in the invoice XML.
- Validation 2 record: a record was made of the validation confirming that the purchase order exists on the Gosocket platform.
- Validation 3 record: a record was made of the validation confirming that the total amounts of the electronic invoice and the purchase order are equal.
7. View the notifications configured in Smart Supply for a document
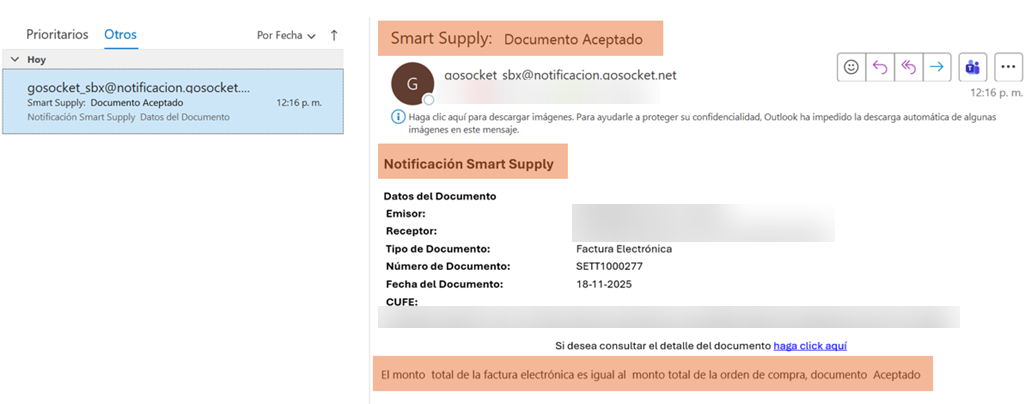
Finally, in our success case where the document ends up in ACCEPTED status, the second validation has an additional action configured: an email notification.
Once Smart Supply assigns the final status to the document, the user will immediately receive an email with the configured subject and the document data so that it can be viewed on the Gosocket platform.
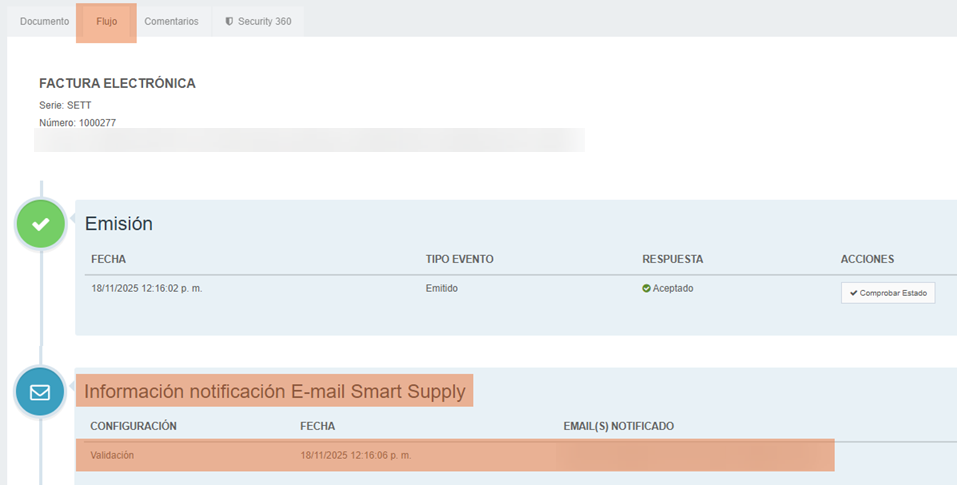
Within the platform, the user can check which other email addresses the notification was sent to. This is done in the document preview, by navigating to the Flow tab.
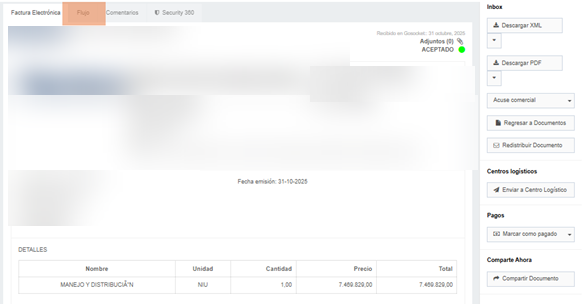
When scrolling to the bottom of this tab, you will find the Smart Supply E-mail notification information section. This section shows the full details of the email notifications configured in the tool. Here, the user can check the following information:
- The email addresses the notification was sent to.
- The configuration associated with that notification.
- The exact date and time it was sent.
Other use cases: Pending · Rejected. To go back to the overview, see Inbox and Smart Supply.