The Spanish version is the authoritative reference. View in Spanish
Use case: Document with Pending Smart Supply status
This page is part of Inbox and Smart Supply. Other use cases: Accepted · Rejected.
1. Requirements a document must meet for Smart Supply validations to apply
Before looking at the practical examples, let us review the four essential requirements a document must meet before Smart Supply validations are applied:
a. The initial reception process takes place when documents enter the Gosocket Inbox through the Exchange Mailbox or the Manual Upload channel (Upload), becoming available in the Received tray.
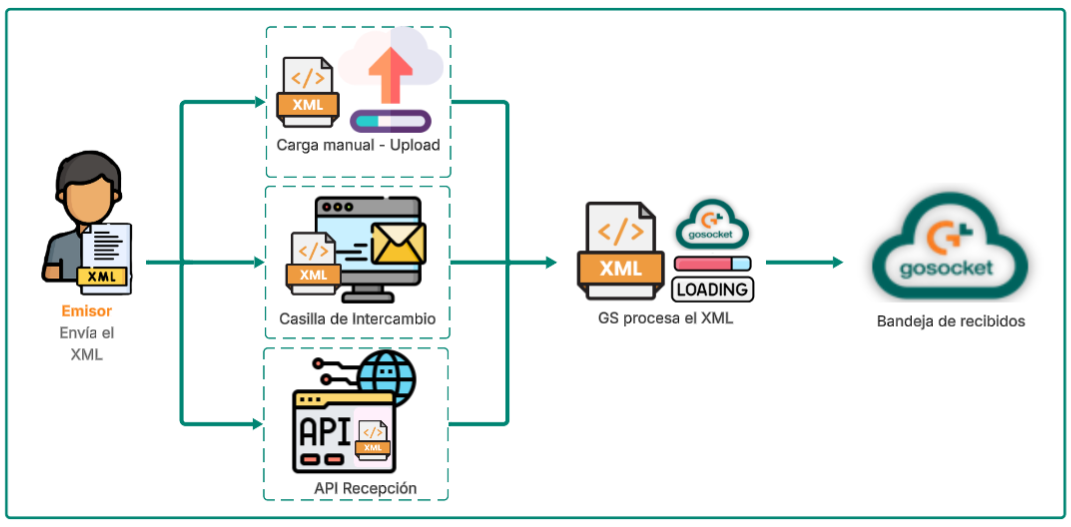
For more details about the reception process in Gosocket, see Manual document upload.
b. The document must successfully pass the mandatory tax validations of Schema, Signature, and validation with the Tax Authority.
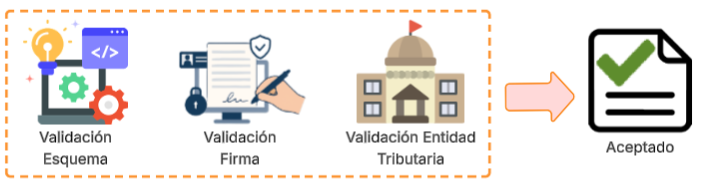
c. Only after meeting the two previous requirements will the document be displayed in the Inbox grid with the verification icon, as shown in the image:

d. In addition, both the invoice and the Purchase Order must be available in the Gosocket Inbox tray.
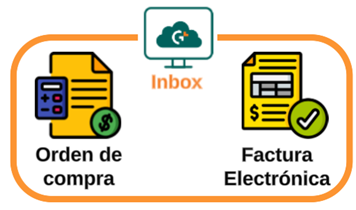
Note: if the document does not pass these reception validations, the rejection icon will be displayed in the Inbox grid

and it will not be assigned any Smart Supply traffic light color; that is, no validation will be applied to it, as shown below:

For detailed information about the different statuses of a document in Smart Supply, see Document statuses in Smart Supply.
2. Description of the use case: when a document is left in Pending Smart Supply status
Next, we will explore how Smart Supply automates an essential business requirement. Use case: "Validate that the invoice amount matches the purchase order amount".
To perform this comparison, Smart Supply, through a prior validation, must ensure that both documents (the Electronic Invoice and the Purchase Order) are available on the platform.
The following conditions are considered for the use case:
- Company B does NOT issue a purchase order to Company A (the purchase order will not be available in Inbox), and
- Company A issues an electronic invoice to Company B for a total amount of $100.
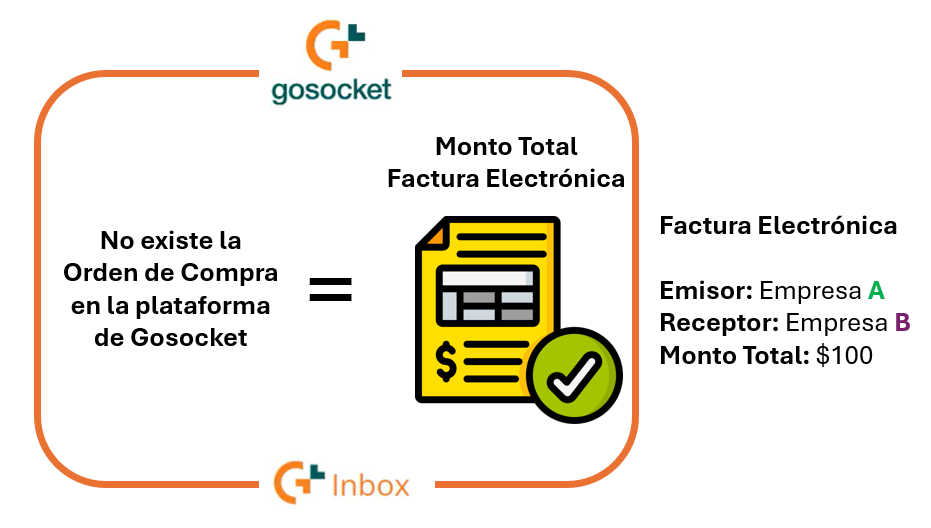
Note: in this scenario, only the invoice will be available on the Gosocket platform.
We have already identified the complete success flow, where the document is left in ACCEPTED status.
For more details about the flow of a document when it is left in ACCEPTED Smart Supply status, see Use case: Document with Accepted Smart Supply status.
We have also identified the complete flow where the document validations are not met and it is left in REJECTED status.
For more details about the flow of a document when it is left in REJECTED Smart Supply status, see Use case: Document with Rejected Smart Supply status.
Now we will explore the scenario in which a document does not meet the business rules and, after going through the Smart Supply validations, is left in PENDING status.
Next, we will break down the Smart Supply configuration to understand precisely how the business rules define this document flow in Inbox when the invoice does not satisfy all the requirements:
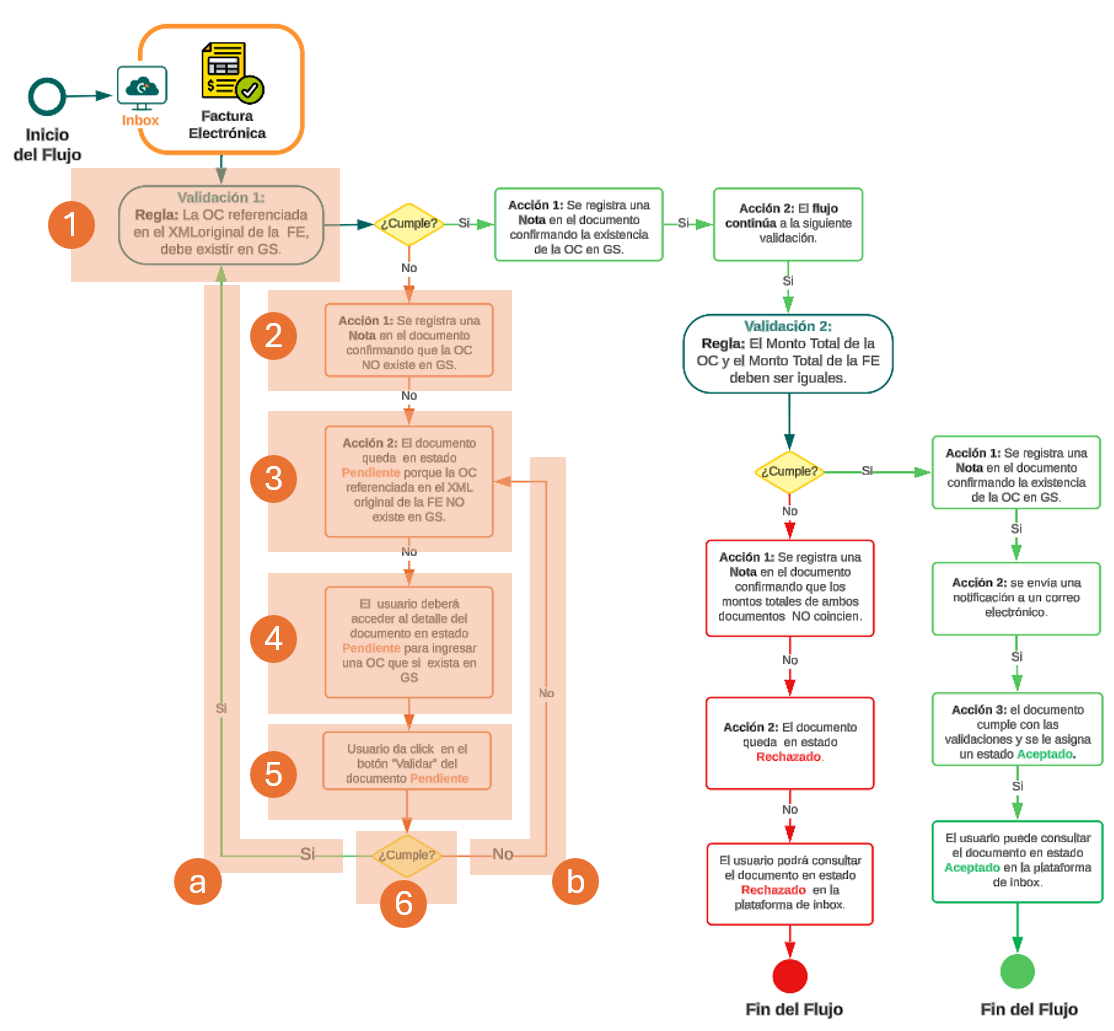
The first validation checks for the existence of the purchase order, and the rule is: the PO referenced in the original XML of the invoice must exist on the Gosocket platform.
If the rule is NOT satisfied for the first validation, Smart Supply executes a first action, which records a note on the document indicating that the PO does NOT exist in Inbox.
The second action executed by the Smart Supply system assigns a PENDING status to the document.
To continue the flow, the user must open the preview of the PENDING document in the Received Inbox. There, the user must provide the missing information within the Smart Supply – Pending Information section.
Once the user has linked the corresponding data, they must click the Validate button within the Pending Information section.
At this point in the flow, two things can happen:
- a. Correct data: if the information entered by the user is correct, the document proceeds to run the remaining validations (such as validation 2 for amounts, described in the previous use case).
- b. Incorrect data: if the information entered does not meet what is expected in validation 1 (for example, the PO entered is still invalid), the document will once again be left in PENDING status.
Based on the flow we have just described, we will now explore the different tools and features we can interact with in Inbox when a document is in PENDING status:
- View a document in PENDING status.
- Expiration date of a document in Pending status.
- Categories of a document in Pending status, and searching for documents with categories in Pending status.
- Text field for entering information in a document in Pending status.
- Query field in the text box of a document in Pending status.
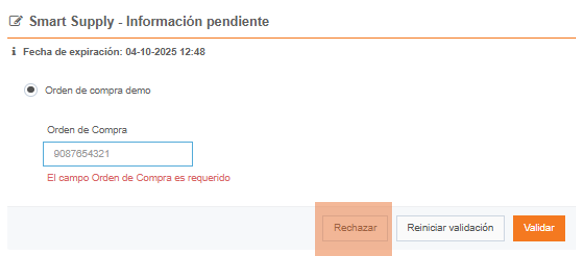
- Reject button: rejecting a document in Pending status.
- Restarting the validation of a document in Pending status, from the document details or from Inbox.
- Validate button: validating a document in Pending status.
Each of them is described below.
3. View a document in PENDING status
To view a document in PENDING status, look it up in the Received tray. In the Inbox grid, the third icon (the Smart Supply traffic light) will be shown in Orange, as shown in the image:

When opening a document in PENDING status from the Inbox grid, the Smart Supply - Pending Information section will be enabled automatically in the preview.
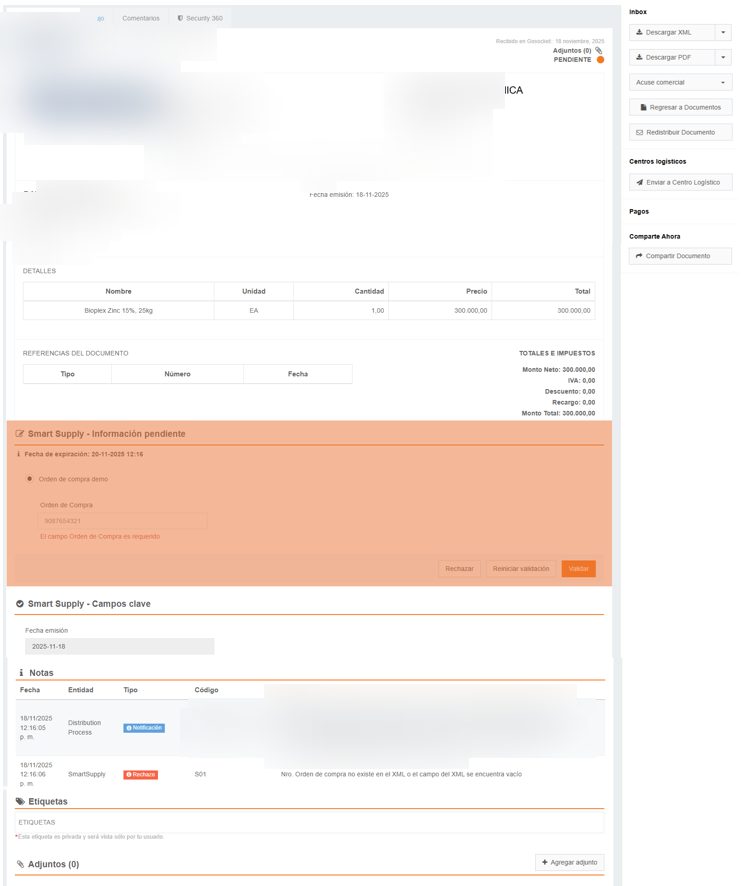
In our example, the user must log in to the Gosocket platform and, within the document details, the Smart Supply - Pending Information section will be enabled. In this section, the user will be asked to enter the purchase order so the process can continue.
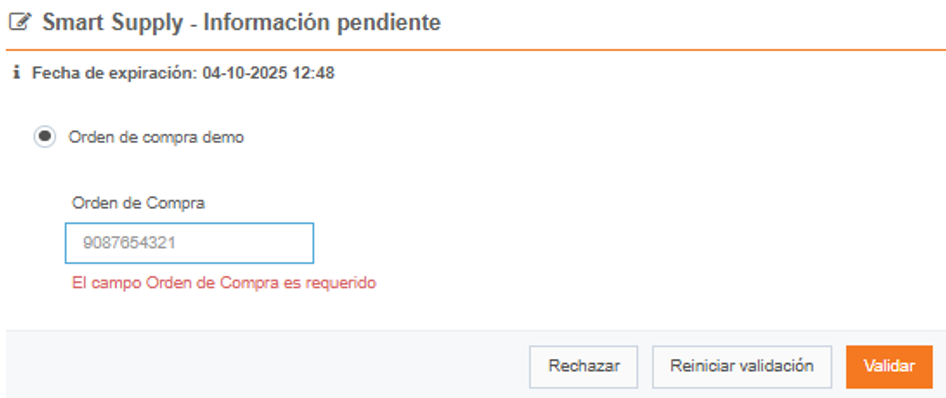
Note: as long as the document remains in PENDING status, the user will also be able to interact with other key features that we describe later.
4. Expiration date of a document in Pending status
The expiration date is a configurable attribute that is only displayed for documents in PENDING status. This attribute sets a parameterized time period which, once elapsed, triggers a predefined automatic action on the document, provided it is still in PENDING status.
For this example, we have the following configuration:
- Expiration time: 3 days.
- Configured action: change the document to REJECTED status.
From the moment the document is left in PENDING status, the system starts counting the three days (including the exact day, hour, and minute).
The expiration time is displayed in the upper left part of the Smart Supply - Pending Information section.
Result when the expiration time is reached: if the user has not entered the requested information by the end of the configured period, the system will automatically change the document status from PENDING to REJECTED.
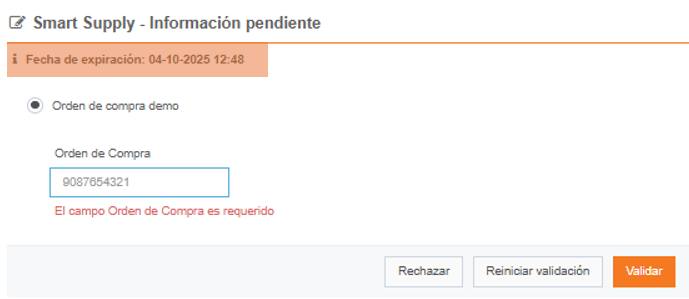
5. Categories of a document in Pending status
Validation categories represent the different flows or paths that can be established for a document within the Smart Supply validation process. Categories are only displayed when the document is left in Pending status, within the document details, in the Smart Supply - Pending Information section.
The purpose of this feature is to allow companies to establish a validation condition (or rule) that, when met, forces the document to follow a specific flow or path. This path will request different information or apply particular validation rules needed to correctly classify the document and carry out the required checks.
For more information on how to configure categories for Smart Supply validations, see the Smart Supply configuration documentation.
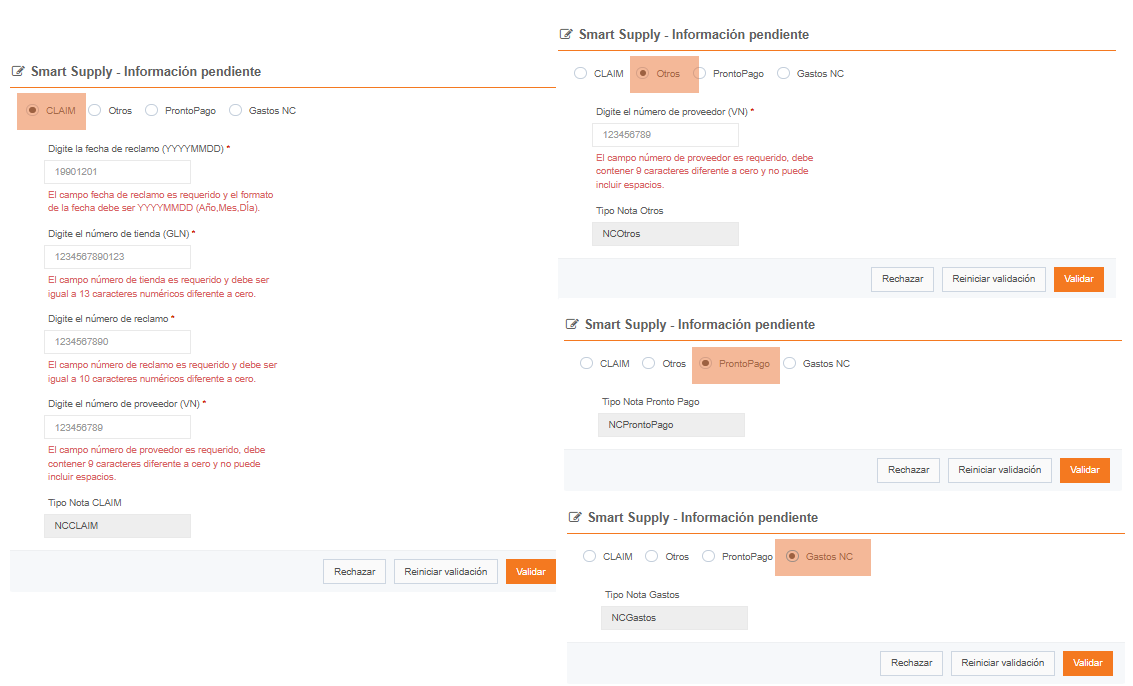
In the following example, the document has 4 categories; each category contains several fields with different conditions. When a category is selected using the radio button and the information is completed, the document will be classified with that selection.
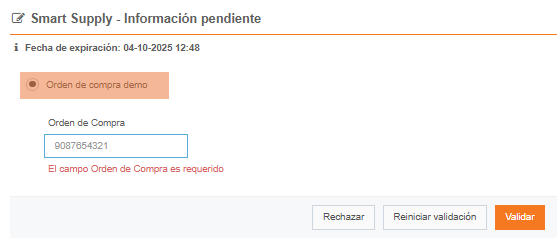
In a second example, we see that the document can also be configured with one category and one field:
Validations can also be configured without assigning a category; in that case, only specific information is requested.
5.1. Searching for a document with categories in Pending status
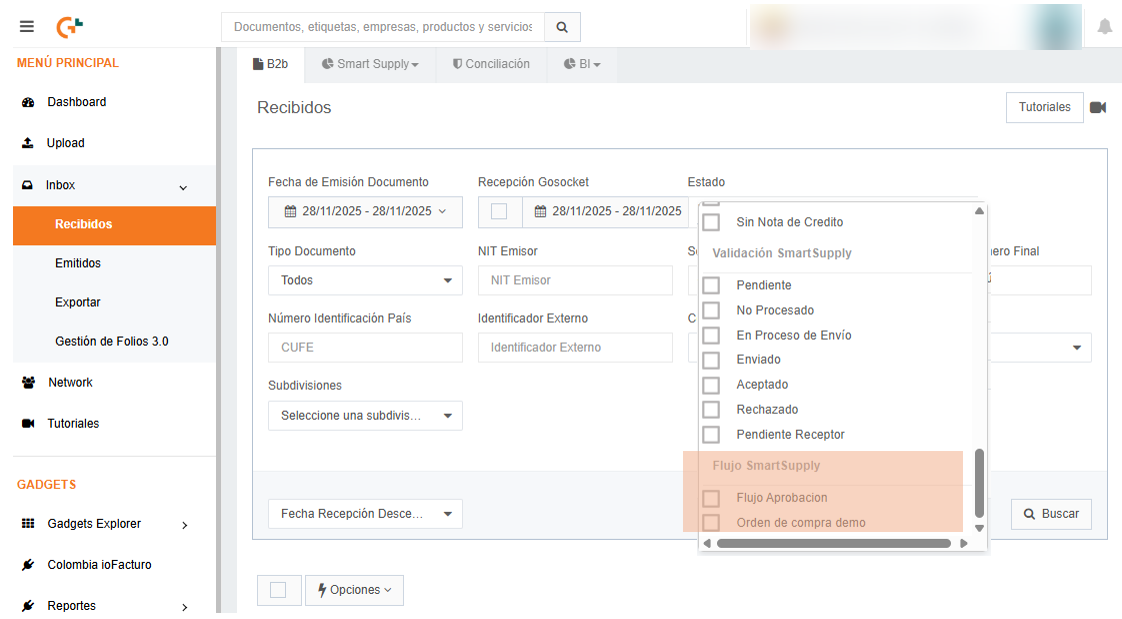
When the company has categories configured on a document that is in PENDING status, such as the "Demo purchase order" category from our previous example, the user can search for the document using the Status filter in the Smart Supply Flow section of the Received tray.
This option refers directly to the categories defined in the client's Smart Supply flow. This filter makes it possible to filter all the documents that have the "Demo purchase order" category configured.
6. Text field for entering information in a document in Pending status
The text field is used to request from the user (supplier or recipient) the missing information that prevents a document from continuing its validation flow.
This field has different configuration features to make it more intuitive and to help the user enter the required data correctly. Let us look in more detail at the different configurations of the text field for entering information in a PENDING document:
i. Field name: this is a free, customizable field that clearly tells the user what specific type of information must be entered in the text box to satisfy the flow requirement.
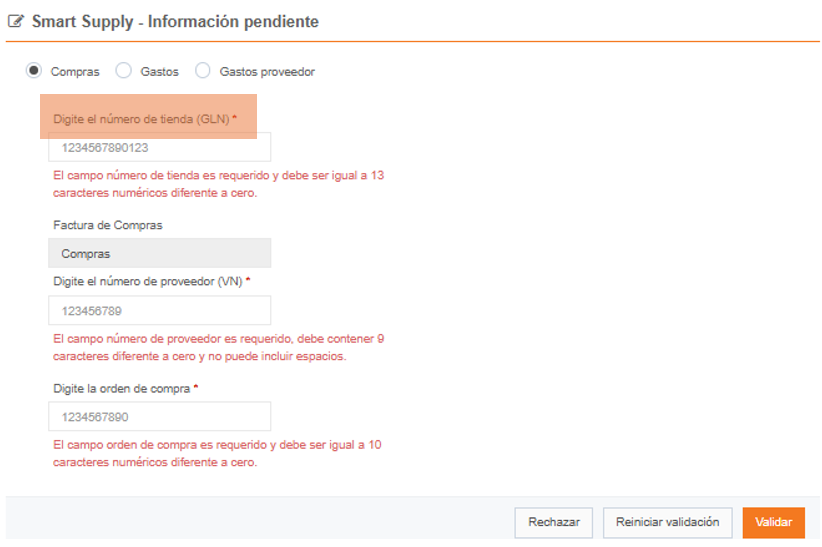
ii. Required field: this is a setting that can be enabled or disabled as needed. When enabled, it is visually indicated by a red asterisk (*) at the end of the field name.
When set as required, the user must enter the requested information in that field in order to continue with the validation flow. If the required field is left empty, the process stops and the document flow cannot move forward.
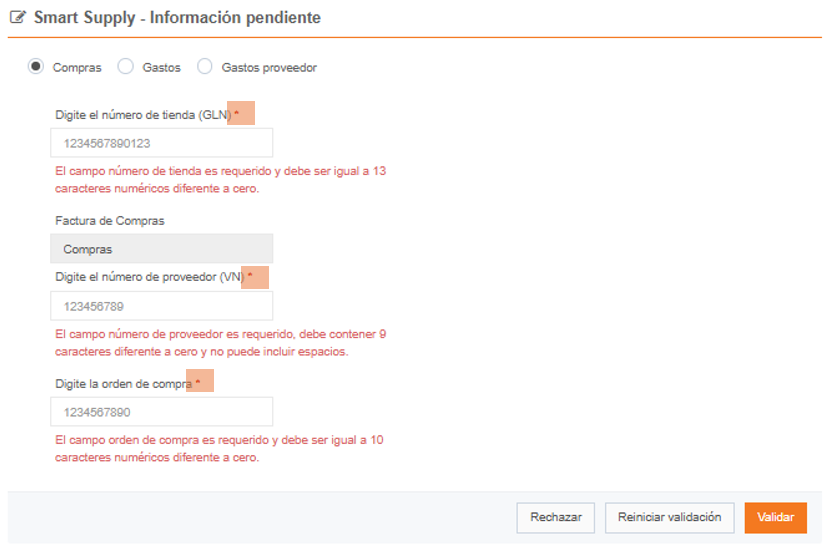
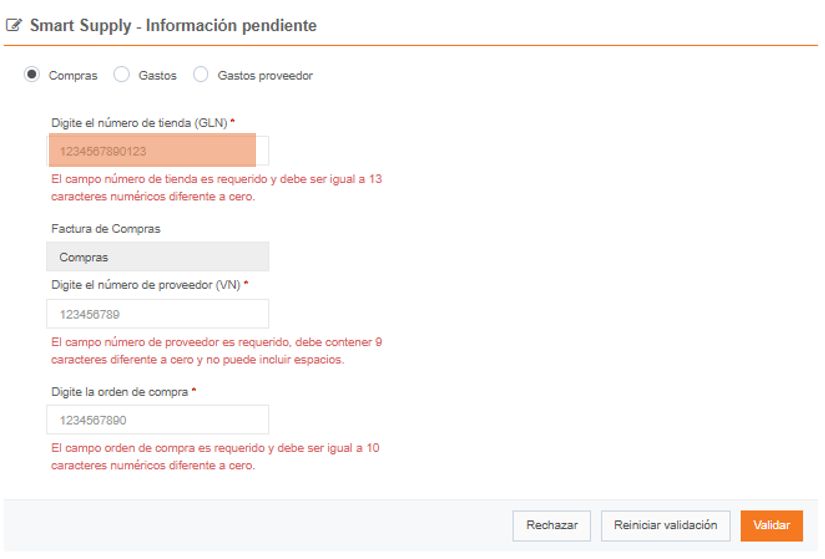
iii. Text box (input field): the text box (or input field) is where the user enters the required information. To make the interaction easier, the text box includes the following guidance feature:
- Placeholder text: displays gray text inside the box as an example or guide to the specific information being requested that the user must enter. This text disappears when the user starts typing.
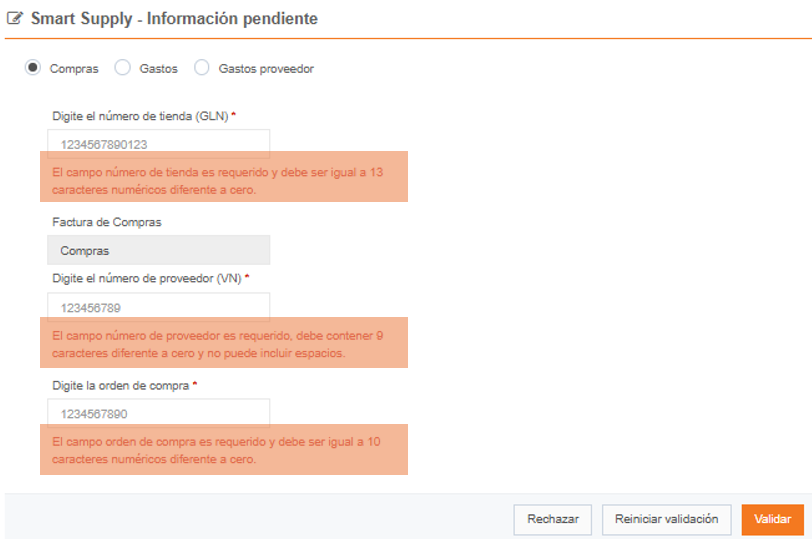
iv. Red help text: the help text (red) is a configurable message that improves the user experience by providing intuitive guidance on the specific information required to continue the flow. This text is fully customizable and is visually displayed in red.
7. Query field in the text box of a document in Pending status
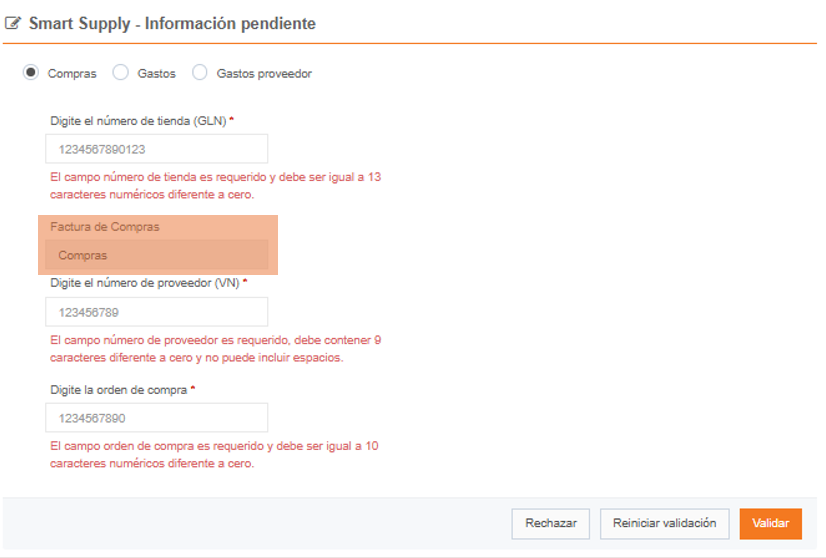
This field offers the option of configuring a default value in order to provide the user with initial guidance or a suggestion. Additionally, this default value can be configured in two ways:
- Editable: the user can modify and overwrite the default value.
- Fixed value (query type): the value is presented as read-only data, preventing the user from modifying it. This is useful when the field acts as a query or reference.
8. Reject button: rejecting a document in Pending status
This option allows a document to be rejected manually when it is in PENDING status. When the Reject button is clicked, the document immediately moves to REJECTED Smart Supply status.
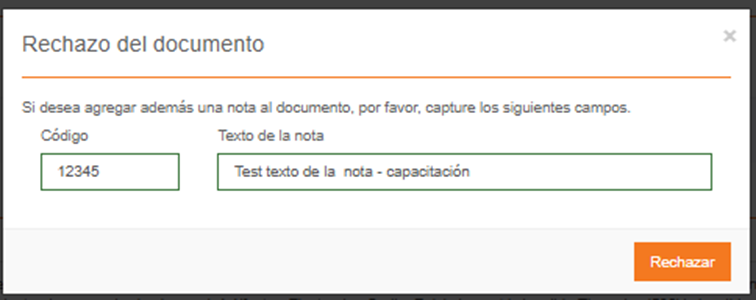
Confirmation window: when clicked, a popup is displayed where the user can enter a code and a description of the reason for the rejection. These fields are not required.
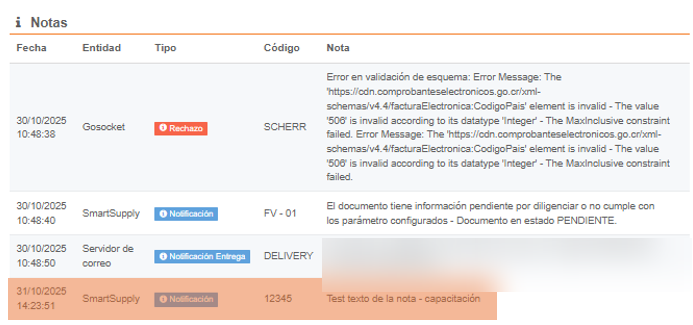
Traceability record: if the user chooses to fill in the code and description, this information is recorded in the document Notes when the rejection is confirmed.
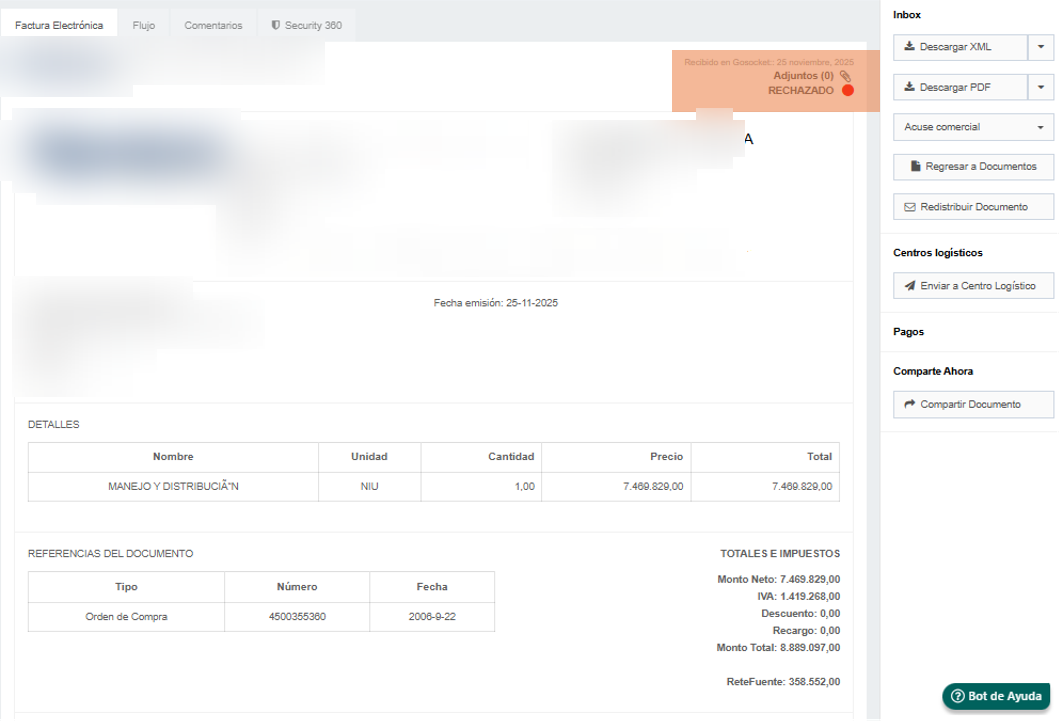
Result: the document changes to a terminal status: REJECTED Smart Supply, and the traffic light is shown in Red.
9. Restarting the validation of a document in Pending status
The option to restart a document in Pending status is intended to restart from scratch all the validations configured for the document.
Note: remember that these options only work if the document is in Pending Smart Supply status.
To restart a document in Pending status, the portal offers several options:
- Restart the document from the Smart Supply - Pending Information section in the document details.
- Manually, from the Inbox Options button: Smart Supply section, Revalidate Documents option.
9.1. Restart the document from the "Smart Supply - Pending Information" section in the document details
The Restart validation button allows the user to restart from scratch all the validations configured for the document.
Functionality: if a document was left in PENDING status because a later validation failed (for example, the amount validation), using this button makes the system run all the rules again starting from the first one, even if that first rule had previously been passed.
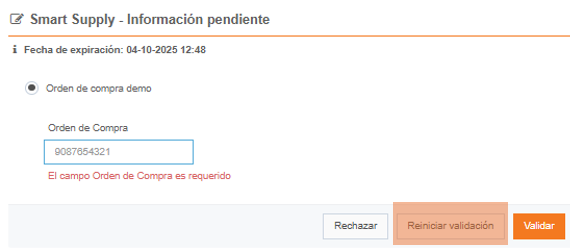
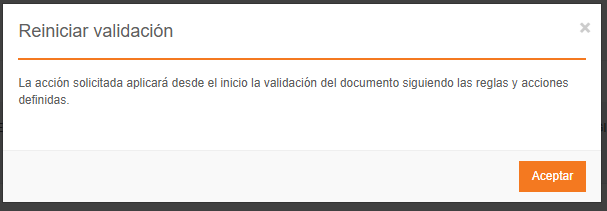
When the Restart validation button is clicked, the system displays the following popup:
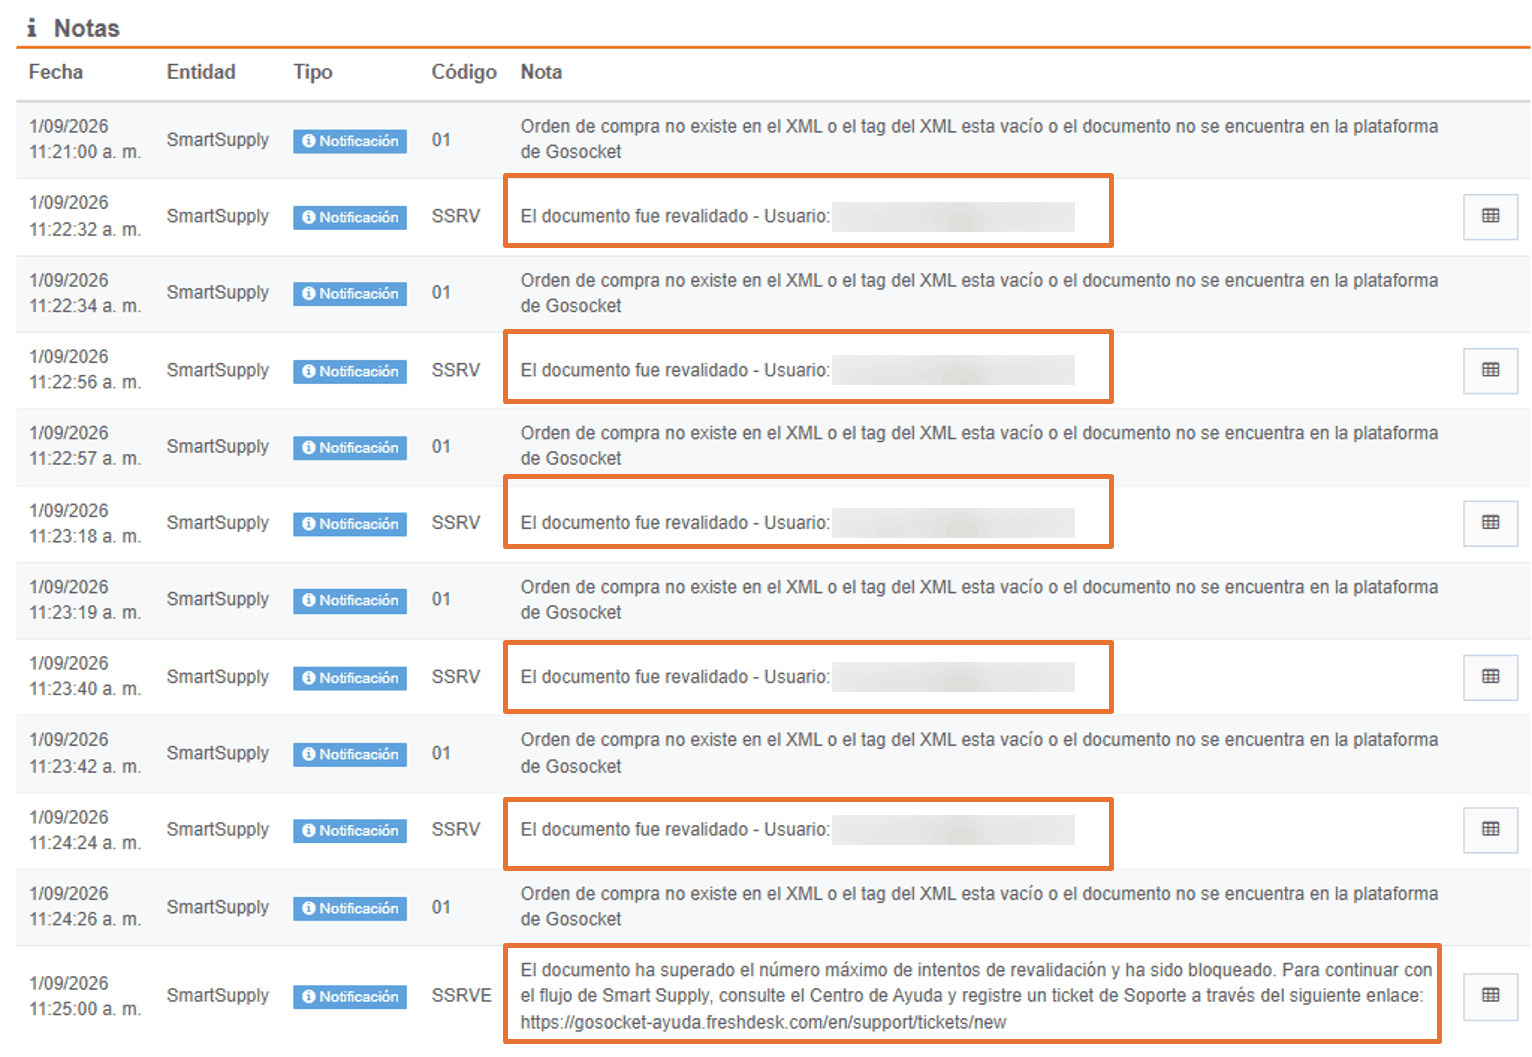
When the revalidation is performed using this button, the Notes section will show that the document was revalidated and will display the user who performed the action.

This action has a usage limit: the supplier can perform this action a maximum of 5 times. On the third attempt to revalidate the document, the system warns the user through a banner at the top of the document details, which indicates how many attempts remain before the document is locked.

If this limit is exceeded, the document will be locked in PENDING status and a banner will be displayed with the message "The requested action has failed. The validation of a document can only be restarted 5 times" (displayed in the platform's interface language).

In addition, a traceability record is kept: each time this function is used, the event is recorded in the document Notes section with the entry:
The document was revalidated - User: correo@ejemplo.com
When this option is used for the fifth time, a sixth note is added stating:
The document has exceeded the maximum number of revalidation attempts and has been locked. To continue with the Smart Supply flow, go to the Help Center and open a Support ticket through the following link: https://gosocket-ayuda.freshdesk.com/en/support/tickets/new
Unlocking: if the document is locked, the supplier must open a ticket to request that it be unlocked in order to continue with the flow.
9.2. Restarting the validation or revalidating pending documents from Inbox
There is another way to start a revalidation of the documents you select from the Gosocket Inbox. To do so, follow the instructions below:
-
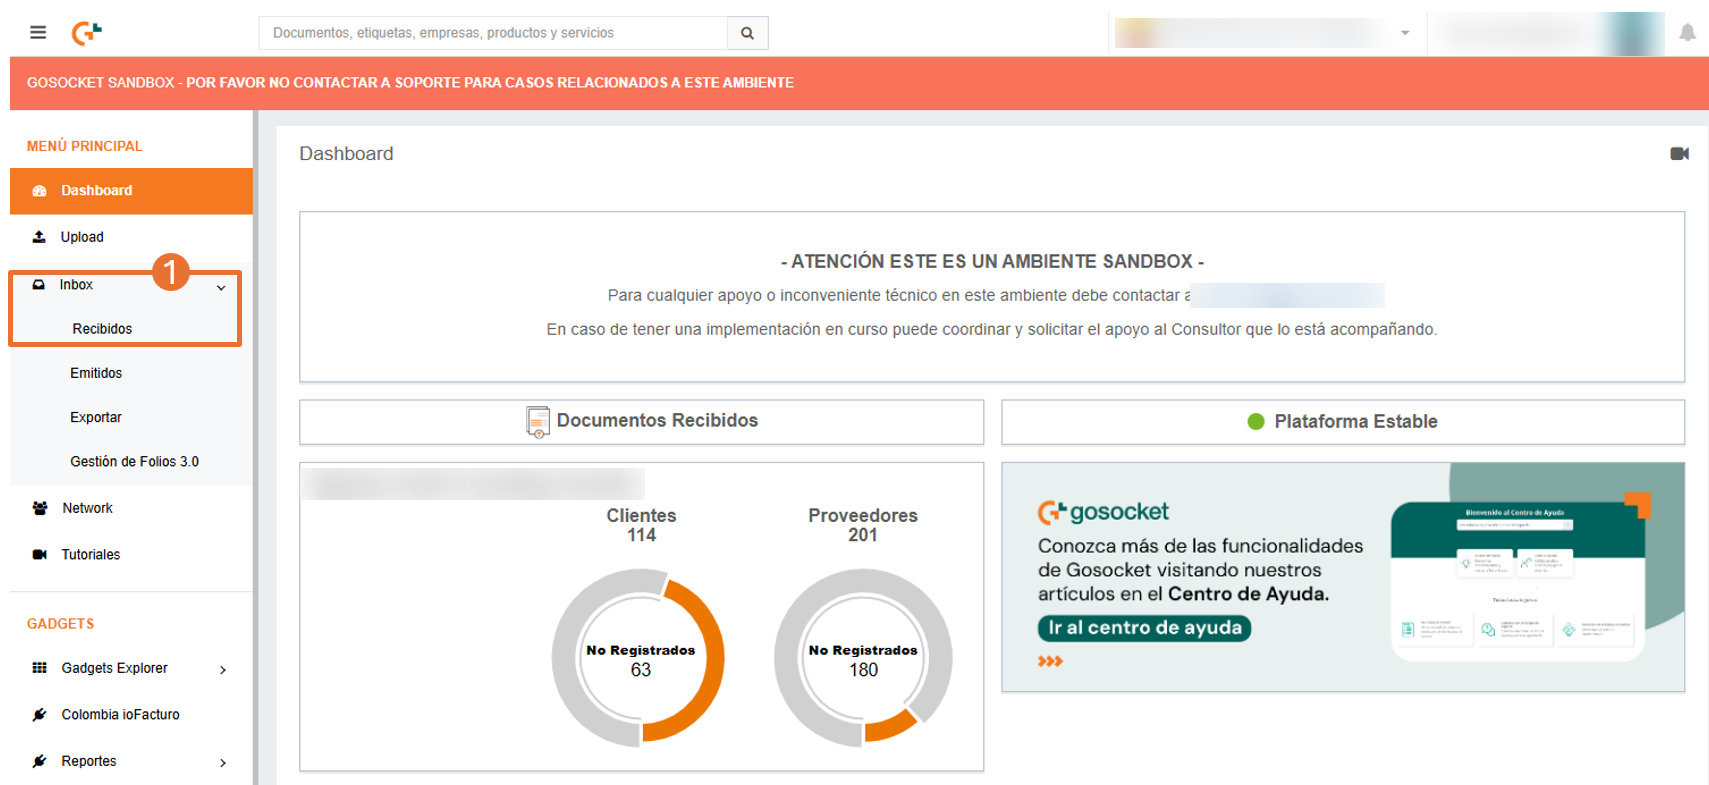
Go to the Inbox module from the side menu displayed in the Gosocket portal and select Received.
-
Enter the filters for searching the document or documents to be revalidated, making sure that in the Status filter you select Pending or Pending receiver from the Smart Supply status group.
-
Click Search.
-
The documents matching the criteria previously set in the search filters will be displayed.
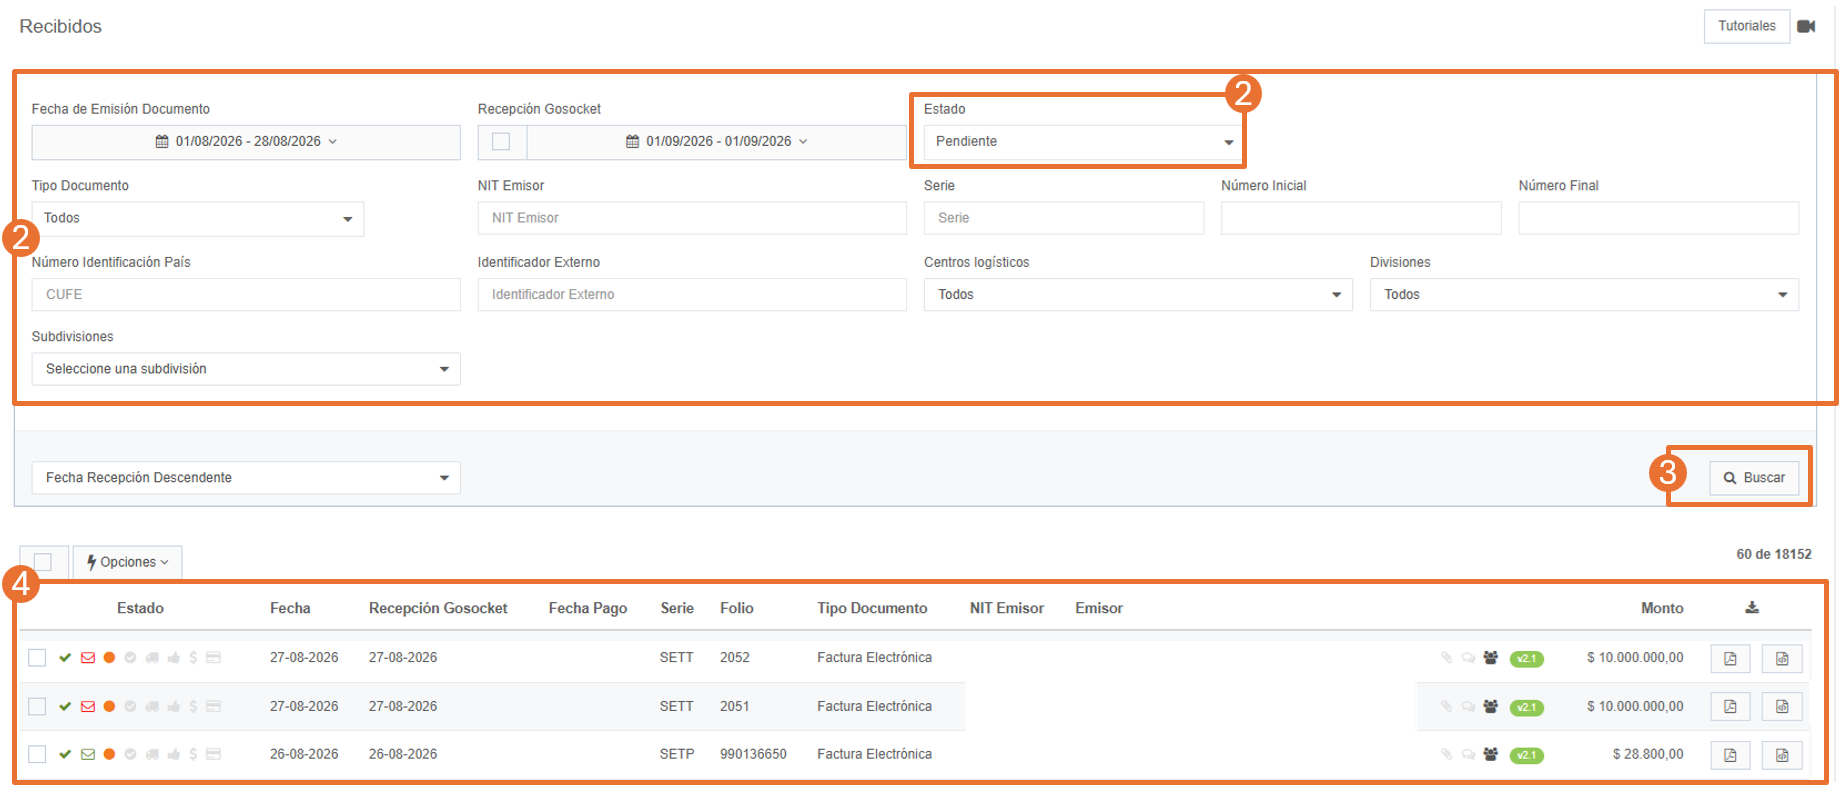
-
Select the documents to revalidate using the selection checkbox.
-
The number of selected documents will be displayed.
-
From the Options button, select the Revalidate Documents option found in the Smart Supply section.
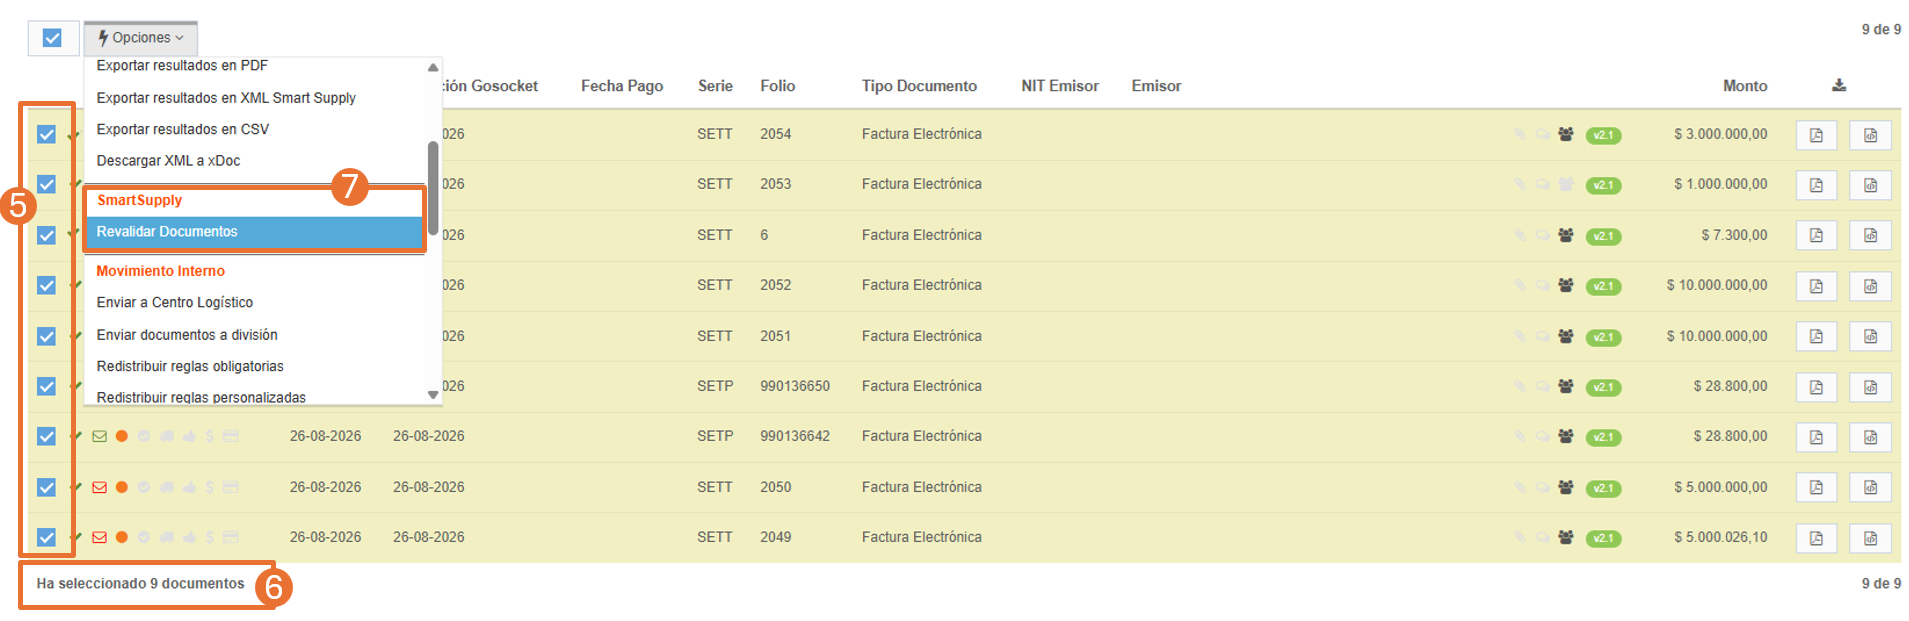
You can revalidate up to 100 documents at a time.
When the Revalidate Documents option is selected, a popup is displayed asking the user to confirm the revalidation of the previously selected documents.
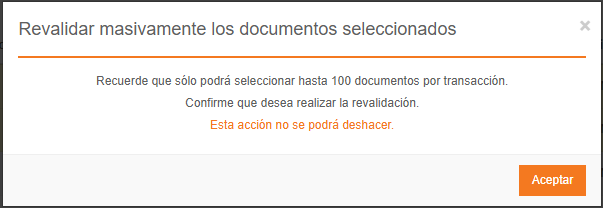
When the Accept button in the modal is clicked, a new popup is displayed confirming the revalidation, as follows:
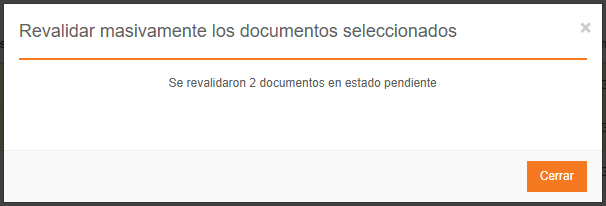
Once the revalidation has finished, the following note will be displayed in the Notes section of the document details: "The document was revalidated - User: correo@ejemplo.com".
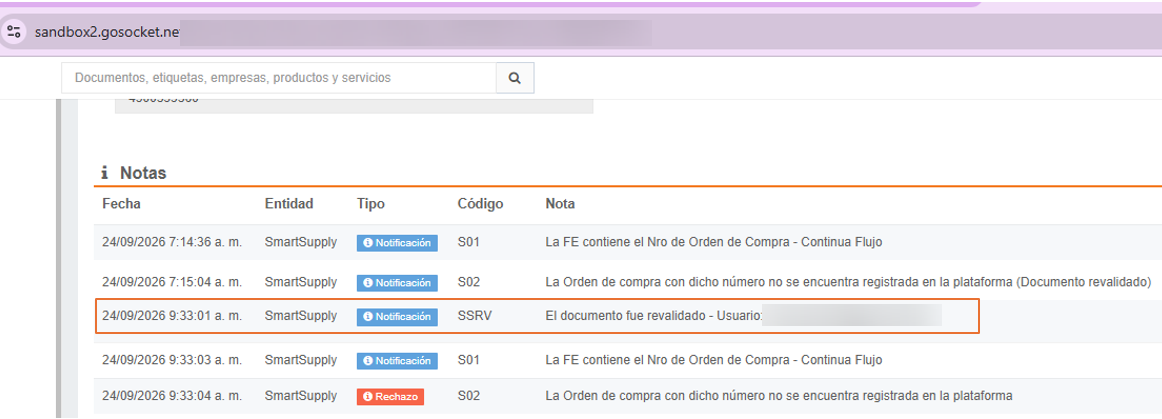
This action has the same usage limit as the revalidation from the document details: the supplier can perform this action a maximum of 5 times. On the third attempt to revalidate the document, the system warns the user through a banner at the top of the document details. If this limit is exceeded, the document will be locked in PENDING status and an informational banner will be displayed.
In addition, each use is recorded in the Notes section with the entry "The document was revalidated - User: correo@ejemplo.com". When this option is used for the fifth time, a sixth note is added stating that the document has exceeded the maximum number of revalidation attempts and has been locked, and pointing to the Help Center to open a Support ticket (https://gosocket-ayuda.freshdesk.com/en/support/tickets/new).
Unlocking: if the document is locked, the supplier must submit a ticket to request that it be unlocked in order to continue with the flow.
10. Validate button: validating a document in Pending status
The Validate button is used when the document is in PENDING status. Once the user has entered the missing information in the text box to continue the flow, they must select this button. When they do, the system re-evaluates the validations and executes the configured actions.
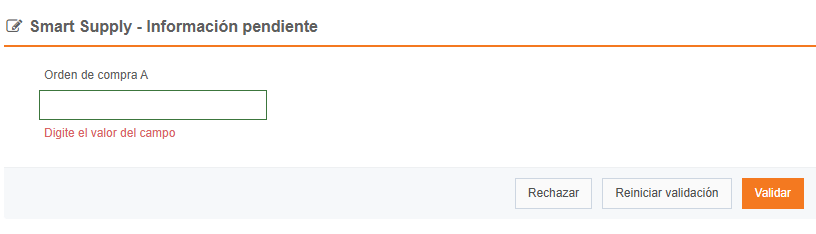
To continue with our example of the PENDING document, once the supplier enters the purchase order number (11223402) in the field enabled within the Smart Supply - Pending Information section and clicks the Validate button:
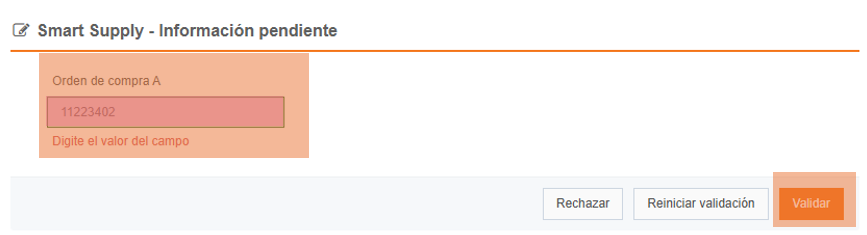
The system writes that information. This data is incorporated into the XML we call the Smart Supply XML, and it is recorded in a specific, previously configured path within the XML.
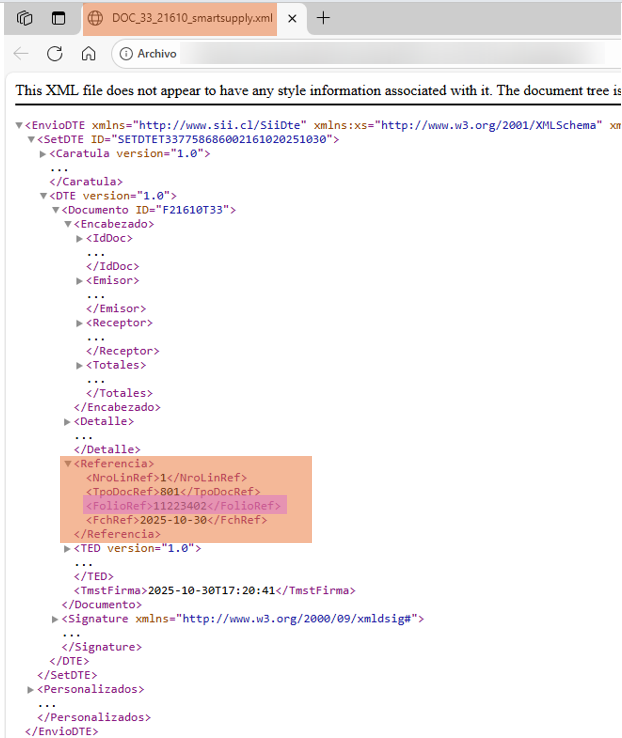
For more details on how to view the Smart Supply XML in Inbox, see Use case: Document with Accepted Smart Supply status.
Other use cases: Accepted · Rejected. To go back to the overview, see Inbox and Smart Supply.