The Spanish version is the authoritative reference. View in Spanish
🗃️ Pool
The Pool section lets you view, manage and configure the different xPOS devices registered in the system.
📋 xPOS list
The table shows a list of every xPOS created in the environment, along with key information for its management.
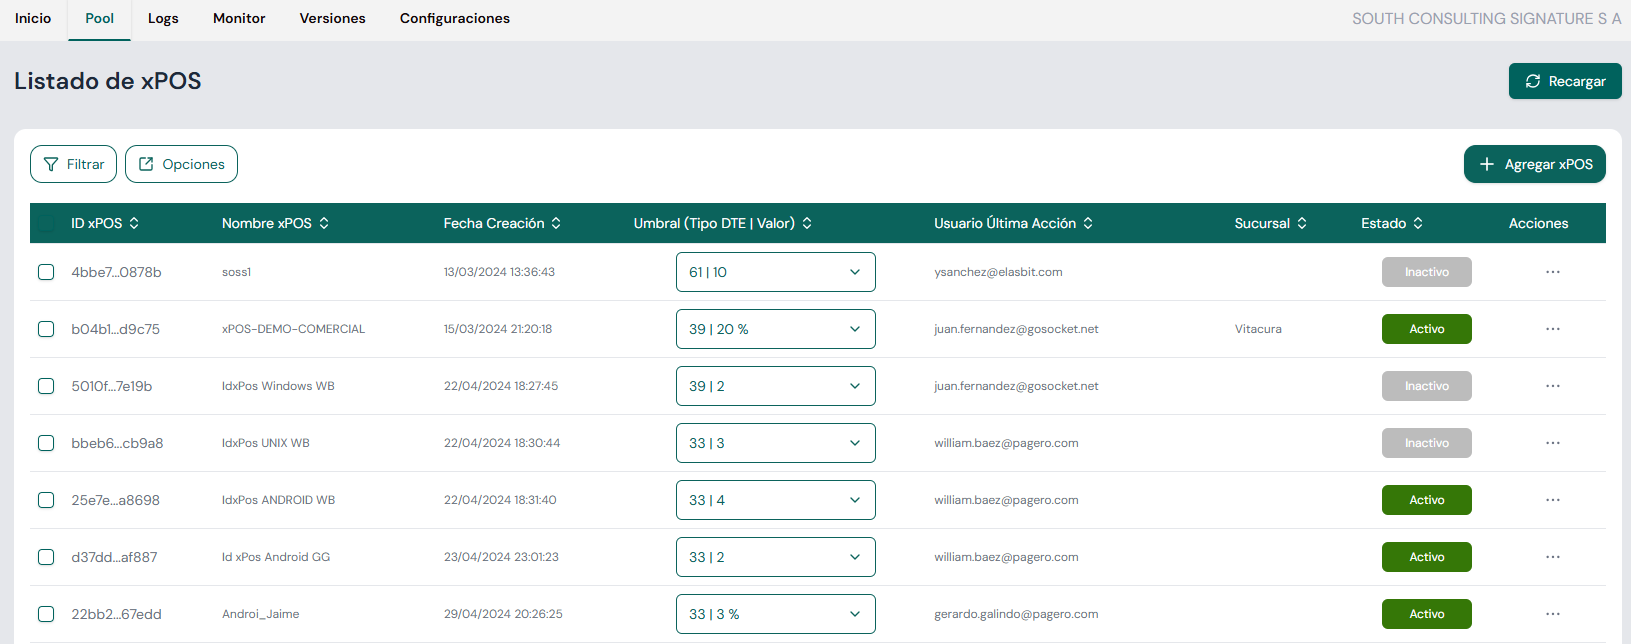
Table columns
| Column | Description |
|---|---|
| xPOS ID | Unique identifier of the xPOS in UUID format. |
| xPOS Name | Name assigned to the issuing-point device. |
| Creation date | Date and time the xPOS was created. |
| Threshold (DTE type | Value) | Document types assigned to the xPOS and the configured reload threshold. * Field available only if Folio Manager 3.0 is enabled. |
| Last Action User | User who performed the last modification or action on the xPOS. |
| Branch | Shows the branch the xPOS belongs to. |
| Status | Shows whether the xPOS is:
|
| Actions | Provides access to more options:
|
🔍 Filter
Lets you apply custom filters to the list, making it easier to find specific xPOS devices.
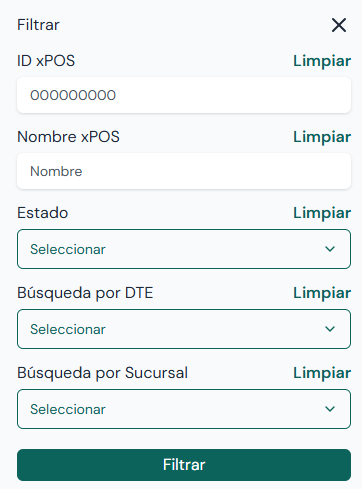
Filter fields:
- xPOS ID: enter the unique UUID of the point of sale. Ideal when you need to look up a specific xPOS.
- xPOS Name: search by the name assigned to the point of sale (e.g. "Caja Central", "Sucursal Norte"). You can enter the full or partial name.
- Status: use this dropdown to filter records by the xPOS onboarding status (Active, Inactive or Blocked).
- Search by DTE: segment by the type of Electronic Tax Document (invoices, receipts, credit notes, etc.) assigned to the xPOS.
- Search by Branch: if your company has multiple branches, select a specific one to view only the movements associated with that site.
Panel actions:
- Clear: next to each field you will find the "Clear" option. Pressing it erases only that filter's content, letting you correct a search without affecting the others.
- Filter: once the desired fields are completed, press the green Filter button at the bottom to refresh the list with the results found.
- Close (X): you can close the panel at any time from the "X" in the upper-right corner if you decide not to apply changes.
You don't need to fill in every field: combinations are allowed — for example "Branch" and "Status" for a quick report of the active points at a given location.
⚙️ Options
Access to general actions on the list.
Export the xPOS list
For a successful export, follow these three steps:
- Select records: from the main Pool screen, tick the checkbox next to each xPOS you want to include in your report. The system only exports previously selected items.
- Open the menu: once the records are ticked, go to the "Options" button at the top of the screen.
- Generate the file: in the dropdown menu, click the "Export" option.
Download result:
- Format: the system automatically generates a CSV file (comma-separated values), compatible with Microsoft Excel, Google Sheets and other data tools.
- Location: the file downloads automatically to the default "Downloads" folder of your computer or browser.
If the "Export" button is not enabled or does nothing, make sure you have correctly selected at least one xPOS in the list.
Import: create xPOS in bulk
This feature lets you register new devices or update the configuration of existing ones in bulk, optimizing implementation time.
File requirements
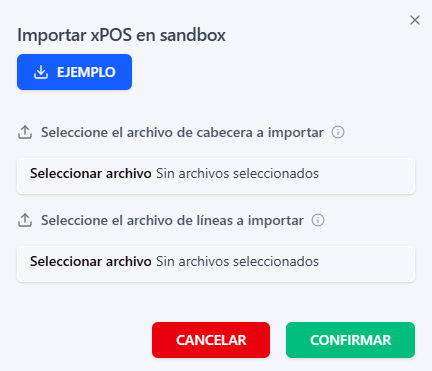
To process an import, the system requires two CSV files to be uploaded. It is essential to respect the column structure to avoid validation errors.
- Header file: defines the basic identity of the device, including its Name and the Branch it will be associated with.
- Lines file (Detail): contains the detailed operational configuration. It lists the DTEs (Electronic Tax Documents) the xPOS is authorized to issue and the folio reload thresholds.
The Lines file only works if the organization has Folio Manager 3.0 enabled.
Step by step to import
- Download the template: before starting, press the "EXAMPLE" button. This downloads base files you can use as a guide to fill in your own information.
- Select the files: click the first "Select file" button to upload the Header file, and the second one to upload the Lines file.
- Confirm: once both files appear as selected, press the green "CONFIRM" button to start the upload and update process.
If you want to cancel the process at any time before the final confirmation, use the "CANCEL" button or close the window from the upper "X".
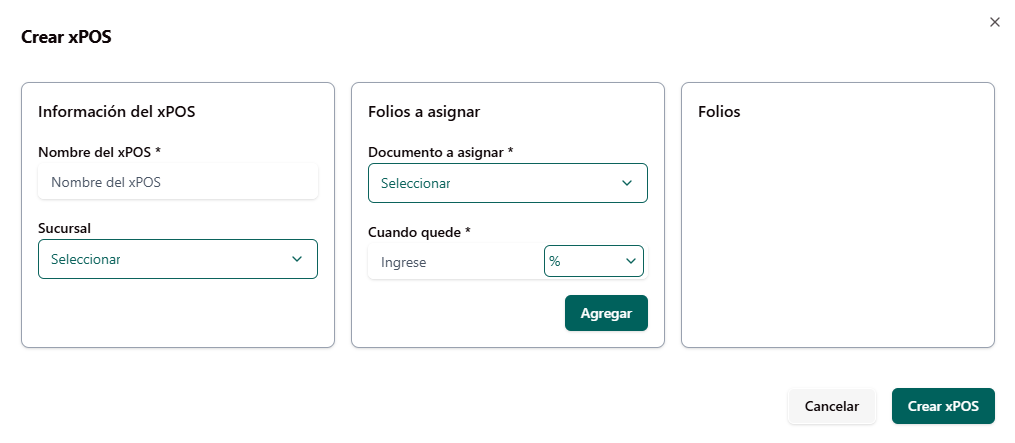
➕ Add xPOS
Opens a form to create a new xPOS. The required fields usually include:
- xPOS name
- xPOS branch
- Assigned document type
- Threshold parameters
🔁 Reload
Refreshes the xPOS table with the latest data from the backend.
Recommended interaction: use this section when registering new issuing points or modifying their parameters.